Records Imported from OCLC and Overlaid in Voyager
1. Because Voyager work involves multiple windows, batching your work is recommended. Start with smaller batches, e.g. 5-6 titles.
Assumptions:
- Under Voyager Session Defaults and Preferences --> General --> Bibliographic Import/Replace Profile the option is set to YL IMPORT CONDITIONAL
- Each title is represented by a record (usually in-process) in Orbis.
- You have verified that the title is not an added copy (i.e. is not already represented by a fully cataloged record in Orbis)
- You are in Staff Orbis
- Under Session Defaults and Preferences-->General-->Bibliographic Import/Replace Profile the option YL Import Conditional has been selected (the default selection when the YUL Cataloging Preferences file is used)
- Current Macro Express files are loaded in your Start tray
2. Search OCLC. Logon through the Connexion client. If a usable record is found, export it.
The Voyager Remote connection has not been enabled for connection to OCLC. Connexion is available in both web and client versions, but exporting to your workstation is only available through the client versions.
TIP: You can export an indefinite number of records to the import files, but you may have problems in Voyager keeping track of what you're doing if you export too many records in a given session.
3. Make sure all Orbis windows are closed except for the target record's bibliographic window (i.e., the bibliographic record to be "overlaid"). If the target record window has not been opened, open it.
4 After the record has been exported from OCLC, you must open the appropriate import file. To run the macro, press Shift F11. The OCLC import file (usually import.dat) will open as a subwindow on top of the main Voyager window.
Note: the instructions assume the standard YUL Macroexpress key mappings are being used.
The OCLC import file (usually import.dat) will open as a subwindow on top of the main Voyager window.
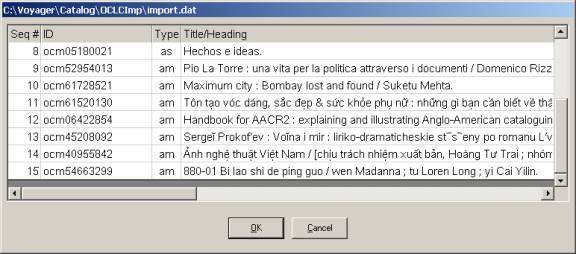
OCLC import file subwindow:
If Macro Express is not being used you will need to perform the following steps from the Voyager menus:
- For the first record use the menu path Record-->Import from new file. The Select Import File window will open. The "Look in:" should be the Catalog folder. In the main window, multiple folder icons will display.
- From the main Select Import File window, double click on the OCLCIMP folder icon. Alternatively, select the appropriate folder icon and click on the OPEN button.
- With the Select Import File now looking in the OCLCIMP folder, doubleclick on the appropriate filename, usually import.dat for OCLC. (Or select the filename and click on the OPEN button). The import file window will open.
For later records, if Macro Express is not being used, use the menu path Record-->From previous file. The OCLC import file (usually import.dat) will open.If you do not want a record from the "previous file," use the "first record" procedure described above.
5. From the import file window, double click on a selection to open it, or select a title and then click the OK button. The import file subwindow will close & the import record selected will open as the main Voyager window; the record will be in MARC format. The Title band will be [Imported record <035 number>]

6.1. Open the Window menu and select TILE. The import record window and the target record window should display side-by-side:

The Orbis target record title bar will begin: Bib <number> <Title>.
![]()
The exported utility record title bar will begin: Imported Record <number>
![]()
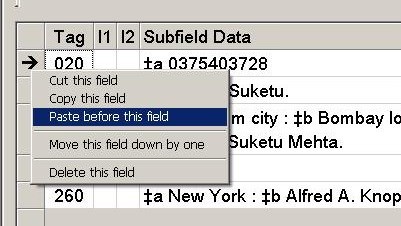
6.2. From the import record window, copy the 035 field generated from the OCLC ID number [see screenshot example below].* (Click on the gray selection bar square to the left of the 035 field to select, then right click on the arrow pointing to the field to bring up the menu, and click on Copy this field) ALTERNATIVE: Select the 035 field and use the standard Windows key sequence Ctrl+c.
*Other control number fields can be used as match points, but 035 ‡a should be considered the best practice. ISBN and LCCN numbers are sometimes recycled into records for completely different titles, thus causing improper matches, and an ISBN with a qualifier (e.g. "(hardcover)") will not match on an ISBN without a qualifier even if the number is the same.
KEEP IN MIND:
- a 035 ‡9 cannot be used as a match point
- Catalog Management staff may often encounter duplicate 035a's due to the nature of their work

6.3. Paste the 035 field into the target record. (Select the first field in the target record, right click on the arrow to open the menu, and click on Paste before this field) ALTERNATIVE: Select the first field in the target record and use the standard Windows key sequence Ctrl+v.
7. It is essential that the cataloger save the target record with the 035 field copied from the import record before saving the import record to Orbis. Verify that the target record has been selected (the color in the title bar should be on if the record has been selected) and click on the Sailboat button to SAVE THE TARGET RECORD TO ORBIS.

(At the beginning of the session, you will be prompted to change your import/replace profile from the default: YL IMPORT CONDITIONAL.

Click on NO. The prompt will not return for the duration of the session.)
7.1. If the MARC Error Report window opens, read the message to identify the problem fields and click OK to close the window.

Edit the import record as appropriate, and click on the Sailboat button again.
7.2. The authority validation dialog box will display.

Click the Continue button in the Authority Validation dialog box.
7.3. A window will open indicating that the record has been added to Orbis. Click OK.

8.1. After the target record has been saved, activate the import record window (click anywhere in the import window; the title bar should change color when the window is activated)
8.2. Next, delete any 9xx fields from the import record; the MARC validation program will block the save until certain 9xx fields are deleted; other 9xx fields (e.g. 948) in the import record will pass but should be deleted nevertheless. [East Asian import records should retain field 987.]
Catalog Management. Since 9xx fields in the target record will be retained in the overlay, when you replace a brief circulation record with an imported record, delete from the overlaid record any 948 field with "suppressed" (upper or lower case; or misspelled) or "GEAC CIRC." Do not delete any other 948 field, e.g. do not delete any 948 fields with transfer and other staff notes ("replacement requested," "deleted 1st ccl copy statement.").
8.3. Click on the Sailboat button to save the imported record to Orbis.
8.4. When the Authority Validation dialog box displays [see screenshot at 7.2], click the Continue button.
8.5. The Bibliographic Dedupe Detection window will display (due to the matching 035 fields on import and target records).

8.6. There should be one record displayed; the target record with the 035 match point. Select the record by clicking on it if it isn't highlighted. (Check with your supervisor if more than one record is displaying)
8.7. Check the menu slot to the right of the Replace/Merge Using Profile button and make sure the menu selection is YL Merge, and then click on the Replace/Merge Using Profile button.
8.8. Voyager will display the message: The record was added to the database. It replaced existing duplicate # <record id number>

Click OK. The target record will disappear. The full record will display, but the title bar will be for the Orbis record, not for the import record.