2. Using Macro Express
A list of basic Macro Express edits and tips that most staff should be able to perform without the aid of an expert user: how to use the Staff Search index macros to change the index in the Search window, how to use locally programmed function keys in Voyager, changing preliminary record templates, how to run the status tracking macro in the circulation module, etc.
Changing Bibliographic Templates from a Pop-up Menu
At the time of the Voyager implementation in 2002, the Yale Cataloging Implementation Team created & distributed a set of 7 templates for creating bibliographic records corresponding to the various bibliographic formats, i.e. books, serials, cartographic materials, CD-ROMs, microfilm, video, & dissertations.
These templates should be used for creating on-order or in-process records based on the format of the item, but changing the template normally takes 8 steps:
- Click Options on the menu bar.
- Select Preferences .
- The window Session Defaults and Preferences will pop up.
- Click the tab Folders/Files .
- Under Templates, click the ... box at the end of Bib directory.
- The window Select Bibliographic Template will pop up.
- Select the template that you would like to set as your default and click OK .
- Click OK on the Session Defaults and Preferences window.
(Many workstations have been re-set to open in Voyager Extensions when the Bib ... box is clicked at Step 5, requiring even more adjustments.)
This is a fairly complicated process, and as a result, on-order/in-process records for non-book items are sometimes created in the books format in error. At the other end of the workflow, If the cataloger has to change the format, the fixed fields require extensive re-editing. If the process of changing the template is simplified, it's hoped that the correct template will be used most of the time.
To simplify template changing, macros have been created to change the template to: books, serials, CD-ROMs, maps, microfilm, & video. The dissertation template was not included because Yale dissertations are not processed by SML Acquisitions; for some reason a template for sound recordings was never created by the implementation team.
In the current configuration, the macros to change templates are mapped to the PopupAcq menu, which must be enabled. The procedure for enabling a macro (or a pop-up menu) is different from the procedure for activating a macro, as described in Tip 1, and is also much simpler! Note also that none of the individual macros are activated; they only run in conjunction with the enabled PopupAcq menu. A macro does not have to be activated or mapped to a key-sequence to be run from a pop-up menu.
Check in Macro Explorer to see if the PopupAcq menu has been disabled. Select (click on) the Acquistions folder under Categories. Find the line item for PopupAcq. Note that pop-up menus have a different icon. If the macro is disabled, it will display in italics.
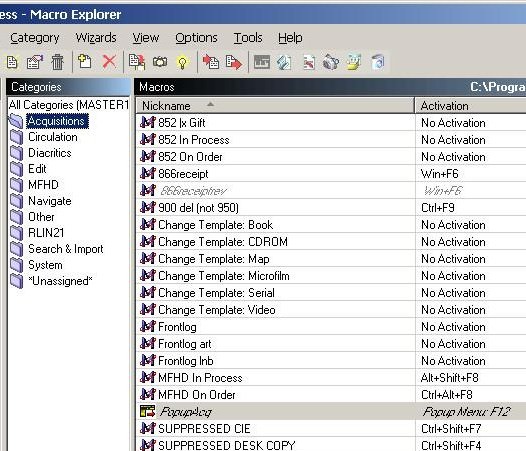
If the PopupAcq menu is disabled, enable it by placing the cursor on the PopupAcq line, right-clicking to open the Options menu, and selecting (clicking) Enable. The line will no longer be italicized when the popup menu has been enabled.

You only have to enable the PopupAcq menu once, if at all. Once the menu has been enabled, it stays that way until you use the menu option to disable it.
Changing a bibliographic template using Macro Express:
The Voyager window must be on top.
Press F12. The PopupAcq menu is mapped to F12 and will display. In the standard configuration, the template macros are mapped to line numbers 6-9, A-B.
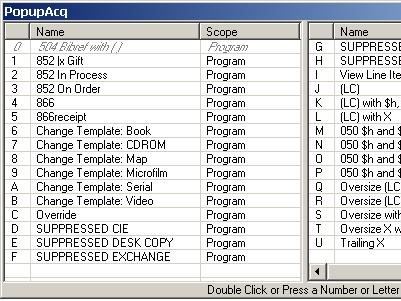
Assuming the default preference has already been assigned to the Book template, change the template to Video by double clicking on B/Change Template:Video or by pressing B on your keyboard.* The video template will display and the PopupAcq menu will close. Enter the bibliographic data for the order or receipt record, and click on Save to DB to create the in-process record.
*CAUTION: pressing F12 automatically selects the PopupAcq window. If you click the mouse outside of the PopupAcq window you de-select the window and the macros will not run. To re-select the PopupAcq window, click on the title bar of the PopupAcq window.
Video template:

If you want to re-set the template back to Books, press F12 and double-click on 6/Change Template: Books, then close the Books template window when the macro opens it.
Copying a Text Macro
Use for routine macros where the only change is to the text. First of all, if you need a particular text for a batch of orders, you can always go into an existing text macro and change the text. However, if you need to use multiple texts repeatedly to process a batch, you have the option of using the copy macro function to create a separate text macro. Instructions:
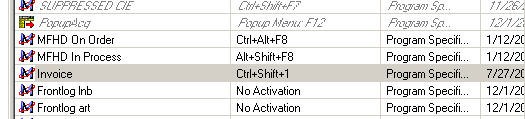
Scenario: Acquisitions macro to type the text Invoice exists. You want to create a macro to type Purchase Order.
1. Determine the key sequence the macro will map to. The key sequence should begin with "Ctrl-Shift": that initial sequence is reserved for custom macros. If you use another sequence, you may conflict with a previously created macro.
Scenario: The existing macro is on Ctrl-Shift-x. You decide the new macro will be on Ctrl-Shift-y.
2. Now click on the Macro Express icon to open the Macro Explorer editing window.
3. Find and select (single click) the macro to be copied (Invoice).
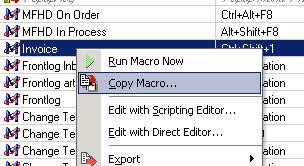
4. Having selected the macro to be copied, do one of the following:
a. Click on the Copy Macro icon on the toolbar. If you place the cursor on the icon a balloon should pop up with the legend "Copy Macro"--in the screen-shot, the icon has been circled.

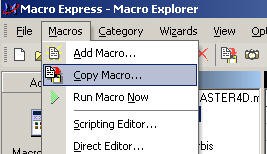
b. Or, click on the Macros menu and select Copy Macro:
c. Or, with the cursor on the macro to be copied line, right click and select Copy Macro from the menu:
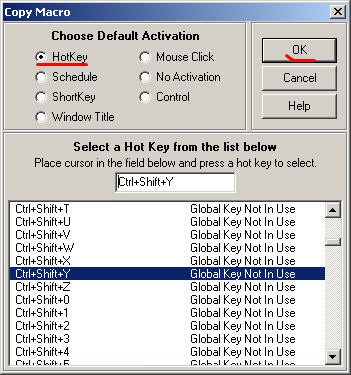
5. The Copy Macro window will open. Verify that the Default Activation: Hot-Key has been selected. Click the cursor in the Select a Hot Key box. Type the key sequence you have decided on. In this scenario, you would type Ctrl-Shift-y. Verify in the window that you have selected the intended key sequence. Click OK.
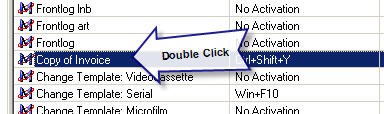
6. A copy of the original macro will now be listed (the name of the original macro preceded by "Copy of"). If you have difficulty finding it, click on the Nickname bar to arrange the macros alphabetically and look under C. Double click the Copy of <macro> line to perform the edits.
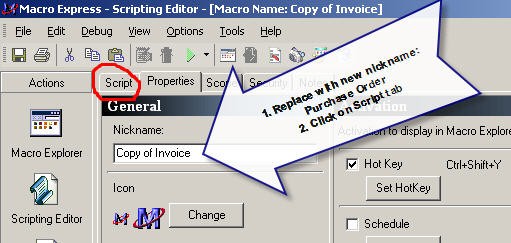
7. When you double click the Copy of <macro> line, the Scripting Editor will open. First click on theProperties tab to open Properties:
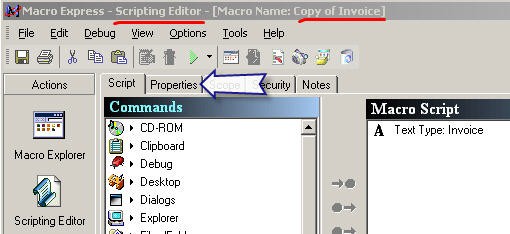
8. In the Properties window, replace the Nickname: Copy of <Macro> with the name of the new macro. In this scenario, Purchase Order. Then, click on the Script tab.
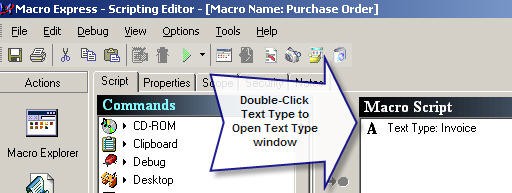
9. Clicking the Script tab will re-open the Scripting Editor window. In the Macro Script window on the right side, double click on Text Type: [text].
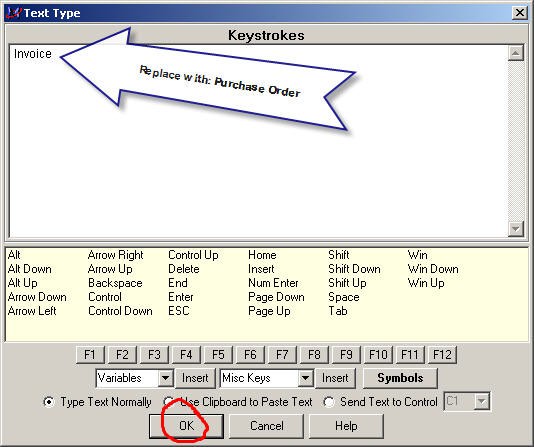
10. In the Text Type window, replace the text. Then click OK.
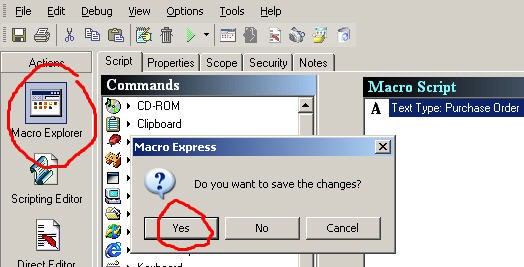
10. When you click OK, the Scripting Editor window will re-open. Clicking OK does not save the macro. You can save in a number of ways:
a. Click on the Macro Explorer icon. This will prompt you to save--click Yes. You will then return to the Macro Explorer edit window, which you can now close.
b. Or, click on the File Menu and click Save on the menu. You will then return to the Macro Explorer window. You can now close the Macro Explorer window.
Override (Voyager Circulation Module)
The Voyager Circulation Module is used for status tracking in several YUL units. As an item moves from one unit to the next, it is charged to the receiving unit's pseudopatron status. When charging an item on Voyager Circulation, most Technical Services workstations require the user to respond to one or two window prompts before the charge is completed. For example, an item wanded to SML Preparations from an SML Catalog Dept. workstation generally will display the following window:

The Override button must be clicked (or one can press ENTER) to get past this Item Blocks window. Often a 2nd Item Blocks window will follow:

Again, the Override button must be clicked (or ENTER pressed) in order to complete the charge:

Thus, a change in status charge can require one or two extra clicks. Not much of a problem when restricted to one or two items, but significant when a shelf's or truckload's worth of books needs to be charged.
The override macro will do all of your clicking automatically:
1. From the Voyager Circulation module, open the Charge window (click on the Charge icon on the toolbar) and wand or type in the pseudopatron code. (There is a macro that can do all of this as well, but we'll deal with that at some other time.)
2. Press F1. (Note that the current default hot-key for the Override macro is no longer F12, which was the hotkey used in earlier versions.)
3. An icon of a running figure will replace the Macro Express icon in the program tray:
Before:
![]()
After:

3. Click in the Item Barcode slot and wand the item's barcode. The macro will override the Item Blocks and Information window(s), charge the item, and position the cursor in the Item Barcode slot for the next item barcode to be wanded.
The current default on the Override macro will allow up to 100 charges. If the maximum number of charges is attained, simply press F1 again. Your Expert User can re-set the macro to a higher maximum number if considered necessary.
4. CAUTION: As long as the Override macro is "on" (i.e., the running figure icon is in the tray), you will not be able to run any other macro (in any Voyager module). To turn off the macro, use your mouse to place the cursor on the running figure icon and right click. The following window will appear:

Click OK and you will be able to resume using other macros.
If you forget to abort, the Override macro has been set to close automatically in 2 minutes and 15 seconds. If you see the following window,

Click OK. The macro "Override" has been aborted dialogue box will appear; click OK again. You can now continue using Macro Express!
PS: The Override macro also works if you have to do multiple discharges:
1. Click the Discharge icon on the toolbar.
2. Press F1
3. Wand barcode of item to be discharged. The macro will click through any Item Blocks and Information window that appears and complete the discharge.
Using a Macro to Select/Change a Search Index
The Voyager search indexes are very extensive, but finding the one you need can sometimes be time-consuming. In the Cataloging Module there are 30+ indexes to select from. If you are a cataloger, you probably use the Staff Name Search index frequently to do authority checking. The Voyager search window usually opens with the Title index on top:

In Voyager you change the index--if your hand is steady--by pulling down the scrollbar, scrolling down until you find Staff Name Heading, and then clicking on it.

Or, you can click in the Search by box and type "s" until Staff Name Heading comes up. The second strategy works pretty well because the most heavily used indexes float to the top.
But if you select an index like Staff Subject Heading and then want to change to Staff Name Heading, you will have to type "s" in the Search by box 13 times (or pull down the scroll bar and click 6 times in the reverse direction and then click on Staff Name Heading). Or, if you didn't remember that you have to click in the reverse direction, you could click 22 times forward and then figure out that you were supposed to click in the reverse direction. Or you could remember that Staff Name is close to Title and Title always comes up first, and type "t" and then "s").
Or, you can use the Search Staff Names Heading Search macro.
First make sure the macro has been activated. To activate the macro, follow the instructions at: Activating a Macro. If you have difficulty following the instructions, get help from your Expert User. The activation instructions are also listed on the Tips for Expert Users section on the Macro Express at Yale home page.
Once the macro has been activated,
-open the Search window (Title will probably be the index displayed in the Search by box); note that the cursor does not need to be in the Search by box
-press down the keys Alt, Shift, and y, and then let go (the keys used to run a particular macro are called hot keys)
-the Search by menu will scroll automatically to Staff Name Headings Search and place the cursor in the Search for box
If you're new to Macro Express, note that you have to let go of the hot keys before the macro can run. All 3 keys need to be pressed down before you let go in order for the macro to run successfully. Don't press down Alt, let go, press Shift, let go, and press y: the macro won't run and the only result will probably be the letter y in the Search for box. You also don't have to snatch your hands away from the keyboard when you let go of the keys, the program will give you enough time to let go. Practice running the macro a bit until you get a feel for the response time of the program. In the documentation and in the Macro Express program's window, it is a convention for the hot key sequences to be punctuated by the plus sign; if the key sequence is given as Alt+Shift+y, don't hold down the plus key when you run the macro.

If you find the Search Staff Name Headings Search macro to be useful, consider activating other Search selection macros, such as Search Staff Subject Headings Search. The Search macros you activate should depend on the nature of the work you do. If you use the ISBN index a lot, activate the Search ISBN (020a|z) macro . If you use the Call Number index frequently, activate the Search Call Number macro. Remember that the index will not work if the database you are working in does not not use it. For example, the Search Staff Name Headings index is not available when the Cataloging Module is opened from Acquisitions.
Why do the Search macros need to be activated? There are around 40 Search macros. Different searches need to be used depending on the kind of work you are doing; most of us don't need to use all of them. Every macro activated means one less key sequence that can be used for custom hot key mapping to macros that might be far more useful for your work. (Most Search macros have their unactivated default hot keys mapped to Alt+Shift, which has been reserved for customized, workstation specific macros.)
Kudos to Eric Friede for creating all of the Search macros. If you have specific questions about the Search macros or ideas about improvement, you can e-mail him by clicking on his link on the Macro Express at Yale page.
Voyager Shortcuts: Function Key Macros You Need to Know About
A number of macros to shortcut Voyager procedures have been mapped to the function keys. We'll go through those that should have wide application in numerical order.
A general tip on using macros mapped to function keys if you aren't used to them. The macro doesn't execute until you stop pressing the key! For example, if the instruction is Shift+F10, press the Shift key and keep it down until you have pressed the F10 key. Then let go (stop pressing) both of the keys.
If you're using the old Macro Express files, have your expert user re-set to the new files so you can use the new & improved function key macros!
Ctrl+F1. Close All Windows
Voyager's "Close all windows" is menu driven & requires use of the mouse: File-->Close All. It can also be somewhat hard to find on the menu:

Using Macro Express,
To close all windows, hold down the Ctrl key and press F1 if you prefer to limit your mouse clicking or if it's more convenient to keep your hands in the keyboard area.
Ctrl+F2. Copy Record ID.
At some point, we all need to be able to copy Voyager record IDs efficiently and accurately in the course of our work. One of the major annoyances in working with Voyager is that it lacks the functionality to copy record ID numbers into the Windows clipboard. One of the nice by-products of our locally developed ExportQ software is that it allows us to copy the Orbis bibliographic record ID to the Windows clipboard. Unfortunately, ExportQ does not allow us to copy the MFHD record ID or the Item Record ID to the clipboard, and there are some instances when this is necessary.
But using Macro Express:
To copy the record ID of any bibliographic, MFHD, or item record in Orbis to the Windows clipboard, display the record and press Ctrl+F2. You should be able to paste the Orbis ID number into e-mail, an electronic document, or another Voyager dialog box.
F5/F6. Retrieve MFHD/Retrieve Bibliographic Record
The macro on F5 is designed to retrieve the MFHD when either the bibliographic or item record window is "on top." (If there are multiple MFHDs, pressing F5 from the bibliographic retrieves the Select or Add Holdings dialog box, which lists all MFHDs associated with the bibliographic record.)
The macro on F6 is designed to retrieve the bibliographic record from either the MFHD or the item record windows.
The macros work best when the windows are maximized.
F7. Open the Retrieve Item Record dialog box.

The standard Voyager procedure for opening the Retrieve Item Record dialog box is menu driven and requires 3 clicks: Record-->Retrieve by Record ID-->Item Record.
Using Macro Express:
To open the Retrieve Item Record dialog box, press F7.
It's a common practice to retrieve records by the barcode number instead of using the Search window indexes, but up till now, getting from the item record to the Bibliographic record usually required going through the Hierarchy window, which required:
- one click to open
- one click to de-select the item record line
- one click to select the bibliographic line, and
- one click to retrieve the record.

Using Macro Express can save a lot of mouse clicking here:
1. Press F7, then wand the barcode. (Wanding includes an automatic Enter command, so the item record will be retrieved)
2. Press F6. (Bibliographic record is retrieved)
Tips:
a. The macros work best when the windows are maximized.
b. The F6 macro sometimes works erratically from the item record even when the windows are maximized, since the timing on workstations varies. Sometimes using the macro a 2nd time will cause it to work for the rest of the session. If this doesn't work, press F5 (to get the MFHD) and then press F6.
PS: Using Macro Express:
Press Ctrl + F7 to create a new item record. (The appropriate MFHD record should be on top when you run the macro.)
F10 Select Orbis Database to Search
If you're in Orbis and want to bring up the Search window without clicking on the toolbar, just press F10.
Shift+F11 Opening the OCLC Import File
You've exported a bibliographic record from Connexion. Now you need to open the OCLC import file (import.dat) so you can save the record into Orbis. The standard Voyager procedure for opening an OCLC import file:
- From the menu. Record-->Import-->From new file. Select Import file window opens, set to "Look in" the Voyager Catalog folder.
- Double-click on the OCLCIMP folder. "Look in" changes to OCLCImp.
- Double-click on the import.dat file icon.
- The file c:\Voyager\Catalog\OCLCImp\IMPORT.DAT opens.
Using Macro Express,
To open the OCLC (import.dat) file, hold down the Shift key and press F11.
Historical note: when different character settings for OCLC and RLIN were used, an earlier version of the macro re-mapped Local import: to OCLC to ensure that the proper character setting was used. In 2006, the only character setting used should be MARC21 UTF-8, which should be pre-set in your preferences. The current macro, Import File OCLC 5.0, does not re-map the character setting to UTF-8. If the MARC21 UTF-8 setting has not been pre-selected, you will see this message if you run the macro:
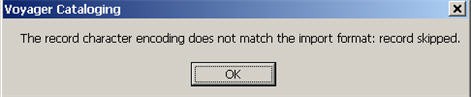
If you see this message, click OK, then open Preferences-->Mapping and re-set Local Import: to MARC21 UTF-8. Then run the macro again.