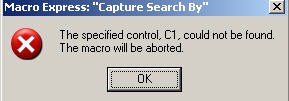
All of the Staff Search macros use 2 nested macros that may need to be adjusted when the Voyager software is upgraded. Attempting to use the macro (e.g. Alt-Shift-Y to change the Staff Search index to Staff Search Names), will abort the macro run and bring up the following window:
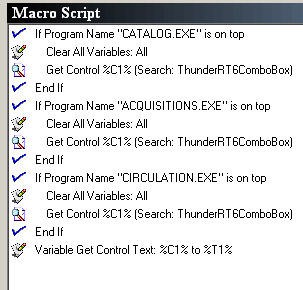
Because the macros are nested, the Search macros point to two separately configured macros, Capture Search By and Go to Search Box instead of including all of the steps in each Search macro. As a result, if something happens to these two macros, none of the Search macros will function. Conversely, if the two macros are properly configured, all of the Search macros should work.
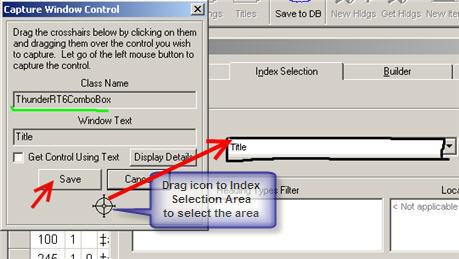
Screen Shot of the Capture Search By Macro Script. Note the "Get Control" lines of the script. These are telling the program where to look before performing the instructions in any of the Search scripts (i.e. to dial up the appropriate search index). Behind the GUI, the Voyager programmers have identified different regions of the windows by various codes. ThunderRT6ComboBox corresponds to the index selection area in the Search window. The only way to identify the underlying code for the window area is to reassign the Get Control instruction.
Preparation. Voyager needs to be running with the Search window open. The Voyager window should not be full screen; you need to see both the small Macro Express utility windows and the Voyager window on your monitor.
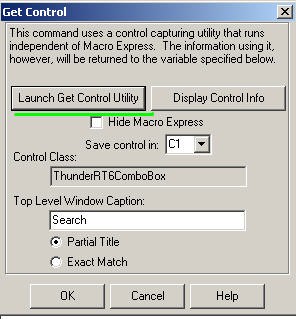
1. From the Macro Express script for Capture Search By macro, double click on the first Get Control instruction line. The Get Control window will open. Note carefully the Control Class text--the area in the Search window corresponding to this coding is what you are looking for. Click on the Launch Get Control Utility button.
2. The Capture Window Control window will open. Note the Cross Hair symbol at the bottom of the window.
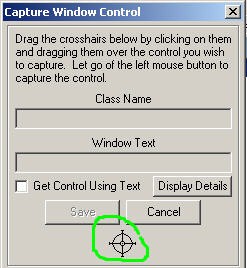
3. Make sure the Capture Window Control window and the Voyager window are both visible on the monitor and that the Search window is open in Voyager. If necessary, drag the Capture Window Control window to a corner of the monitor display so it can be accessed while the Voyager Search window can be seen.
4. Drag the cross hair icon to the search window (point and hold down the default left mouse button). The process will open a black lined rectangle. Use the mouse drag to make sure the rectangle overlays the select index slot. If the rectangle is correctly positioned, the Window Text in the Capture Control Window will be: ThunderRTComboBox. When that text displays, click the Save button.
5. Repeat the process for the other Get Control lines in the script. The Variable Get Control Text line should not be changed.
6. Save the updated script.
Next, update the Go to Search For Box macro. This macro script is simpler:
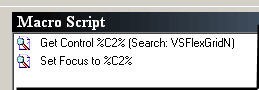
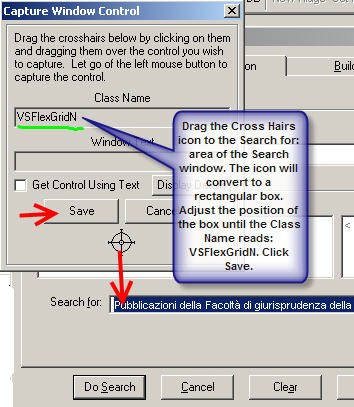
Follow the instructions for the Capture Search By macro, but select the Search for area of the Voyager Search window. Be sure that the cross hair is correctly aligned--the required area is very close to different areas. In the Capture Window Control, the Class Name text must be: VSFlexGridN. Note that you are changing C2 rather than C1. Only the Get Control line should be updated; be sure to save the updates. Since the macros are nested in the Search macros, updating the Capture Search By and Go to Search Box macros will allow all of the Search macros to function.
PS: Re-selecting and re-saving the class names is apparently required because the values in the hierarchy (click on the Display Control Info button on the Get Control Window) changed with 7.0.2. Re-selecting and re-saving re-synchs the macros.