Macro Express @ Yale
What is Macro Express?
Macro Express is a licensed macro utility used to record, edit and play back mouse and keyboard macros. It is used in conjunction with Voyager in support of technical services processing.
What is a Macro?
A macro is a set of commands that can be played back at will to perform a given task. These tasks can be something simple such as inserting your name and address into a word processor to something more complex such as launching a program, copying data from it, activating another program, pasting the data into it and repeating this several times. Tasks performed by macros are typically repetitive in nature allowing significant savings in time by executing the macro instead of manually repeating the commands.
Creating a Macro
There are several ways to create macros with Macro Express. One method is to capture (record) your keystrokes and mouse movements. Another method is to use the Quick Wizards. The Quick Wizards guide you through a series of questions and build the macro for you. Or you can build your own macros with the Scripting Editor or Direct Editor. YUL uses the Scripting and Direct Editor programs because the capture method is difficult to distribute over the network because of differences in workstation configurations. However, staff are free to use the capture method for unique or special processing needs. The tutorial provides examples of creating macros through each of these methods.
Playing Back a Macro
Macro Express offers several methods for executing macros. These include the use of Hot Keys, ShortKeys, Timed Macros, Window Activation, Mouse Clicks, Popup/Floating Menus and several others.
-
A HotKey is a set of keys on the keyboard that are pressed to initiate the macro. This could include pressing CTRL+ALT+R or CTRL+F12 or any number of combinations. The HotKey is the primary means of executing macros at YUL.
-
A ShortKey is a small string of characters. When a matching combination is keyed in from the keyboard, it is erased and the assigned macro executes. You could use the small string of #add to type out your address.
-
A Scheduled Macro executes on a given time schedule. Scheduled Macros have not been utilized at YUL.
-
For Window Activation, a macro runs when a specific window gains focus (appears) on your computer. At YUL, Window Activation is used at certain steps in complex macro strings.
-
A macro may be triggered by clicking on a specific area of the screen with the left, right or middle Mouse button. This method is not recommended for mass distribution at YUL.
-
A Popup Menu or Floating Menu is basically a list of defined macros. Once the list is displayed, click on the desired macro or press an associated number or letter to execute the macro. At YUL Popup Menus have been used as a substitute for memorizing multiple hotkey sequences, e.g. for diacritics and acquisitions macros. Floating Menus have not been used.
-
A macro can be activated through a Batch File or Command Line. This option has not been used so far.
-
Macros may also be activated through Windows API calls or Windows Explorer. Neither of these options have been used so far.
-
Run a macro from the Macro Explorer by using the Run Macro Now option. This is sometimes used for disabled macros, again, to avoid memorizing keystrokes, but would not be considered a best practice.
Macro Scopes
Macro scopes allow you to place restrictions on your macros. You can assign macros to play back in all Windows programs, in one specific window or program, or in every program except the one you define.
Macro Express @ Yale is organized under 3 categories:
Documentation is used to maintain consistency of application and records standard keyboard assignments, expert user checklists, keypad maps, mapping of macros to function keys, training materials, and so on.
Using Macro Express is a list of basic tips and tricks.
Creating and Editing Macros is more advanced and gives step by step instructions for creating typical macros at YUL.
For further information, consult the Macro Express Help files, which provide detailed tutorials for creating and applying macros in Macro Express.
1. Macro Express Documentation
Macro Express Documentation includes maps to locally assigned function keys and key sequences, general guidelines for expert users for tuning up the program on new workstations, and training materials.
Links:
Complete Macro Express Keyboard Assignments, Including Currently Unassigned Key Combinations, No Annotations [1] (Excel)
Basic Macro Express Function Keys Keyboard Template [2] (Word; requires legal size paper)
Basic Macro Express Function Keys
REV:02/12/09 All in Cataloging Module unless otherwise indicated
Key |
Action |
Notes |
| F1 | Activates Override macro | CIRC MODULE ONLY: Automatically enters Override Popup windows |
| Ctrl+F1 | Closes all records | Cursor can be anywhere in an activated window. |
| Shift+F2 | Retrieves Headings window | Cursor can be anywhere in an activated window |
| Ctrl+F2 | Copy record ID | Copies record ID of bib, MFHD, or item record displayed |
| Shift+F3 | Retrieves Titles window | Cursor can be anywhere in an activated window |
| Shift+F4 | Adds (LC) to the end of the call number | Click on the selection column at the 852 field; runs whether or not the 852 field is highlighted, but selection column arrow must be pointing to 852. Run after the basic call number has been pasted into 852 ‡h and ‡i |
| F5 | Open MFHD or MFHD dialog box | Cursor can be anywhere in an activated bib or item record. MFHD opens if single MFHD; dialog box opens if multiple MFHDs. |
| Shift+F5 | Adds (LC)+ ‡m Oversize | Click on the selection column at the 852 field; runs whether or not the 852 field is highlighted, but selection column arrow must be pointing to 852. Run after the basic call number has been pasted into 852 ‡h and ‡i |
| Ctrl+F5 | Adds + ‡m Oversize | Click on the selection column at the 852 field; runs whether or not the 852 field is highlighted, but selection column arrow must be pointing to 852. Run after the basic call number has been pasted into 852 ‡h and ‡i |
| F6 | Retrieves bib rec from MFHD | Cursor can be anywhere in an activated MFHD or item record |
| Shift+F6 | Enters 866 field (with indicators) | Position cursor in any cell of preceding field or in selection column of preceding field |
| Ctrl+F6 | Creates new MFHD | Cursor can be anywhere in an activated bibliographic record |
| F7 | In Circ module, enters your most heavily used patron code | You need to identify your most heavily used patron code and enter it in the script loaded on your workstation |
| F7 | Opens retrieve barcode window | Cursor can be anywhere in an activated window |
| Shift+F7 | Retrieves item record(s) | Cursor can be anywhere in an activated MFHD record |
| Ctrl+F7 | Creates new item record | Cursor can be anywhere in an activated bibliographic or MFHD record |
| Ctrl+F9 | 9xx delete | On bib record, deletes all 9xx except 950. Cursor can be anywhere in the activated bib window. |
| F10 | Opens Search window | Cursor can be anywhere in an activated window (should also work if a subwindow is open) |
| Shift+F10 | Formerly Remote connection to LCDB; this hotkey is now open for customization | |
| Ctrl+F10 | Converts EAN to ISBN | CAT MODULE: Open search window, select ISBN index & position cursor in Search for; wand the EAN barcode |
| F11 | Formerly Open RLIN IMP file; this hotkey is now open for customization | |
| Shift+F11 | Open OCLCIMP file | Cursor can be anywhere in an activated window (should also work if a subwindow is open). |
| F12 | Opens POPUP MENU | If cursor needs to be positioned, insert before activating the menu. When the menu is activated, either double-click on the macro name or enter the number or letter associated with the macro. |
| Shift+F12 | Adds ‡dCtY to 040 field | Cursor can be anywhere in 040 EXCEPT beginning of field Modify MARC21 location code if necessary |
| Ctrl+F12 | Inserts 040 CtY‡cCtY above field selected | Cursor can be anywhere in the succeeding field. Modify MARC21 location code if necessary |
| Shift + Delete key | Erase End of Field | Deletes all text to the right of the cursor in a given variable field. |
| Shift + Insert key | Opens window of subsequent next title (and closes the top window) | Use when multiple titles are retrieved from a search. From the Titles List window, select and open window for a title. From the bib window of the title selected, running the macro will open the next window and close the top window. |
| Ctrl + Insert key | Opens previous window from title list (and closes the top window) | Use when multiple titles are retrieved from a search. From the Titles List window, select and open window for a title. From the bib window of the title selected, running the macro will open the previous window and close the top window. |
| Ctrl + Keypad 5 | Switches Macro File | Switches to master1.1D.mex file if master1.1N.mex is up; switches to master1.1N.mex if master1.1D.mex is up. (Switching to master1.1N.mex allows use of number pad) |
Macro Express Hot Function Keys
- Unless otherwise noted, all functions are active only in the Cataloging Module. Unless otherwise noted, cursor position is irrelevant
- Nickname and Key Sequence based on master5.mex file.
- If a Hotkey is designated as NO ACTIVATION, assign to an unreserved key sequence within range: Ctrl+Shift, Alt+Shift, or Win+Ctrl.
- Unactivated and activated keys may also be assigned to a Popup Menu.
- DISABLED keys display in italicized form in the MacroExpress Macro List. To enable, Select-->Right Click-->Click on Enable Macro
| NICKNAME | HOTKEY | ACTION AND NOTES |
| ACQUISITIONS FOLDER | ||
| 852 |x Gift | No Activation | Inserts ‡x Gift staff note. Cursor can be anywhere in the MFHD record. |
| 852 In Process | No Activation |
Inserts ‡h In Process after ‡b <location>. Note this deletes all text after <location>.
Cursor can be anywhere in the MFHD record.
|
| 852 On Order | No Activation |
Inserts ‡h On Order after ‡b <location>. Note this deletes all text after <location>.
Cursor can be anywhere in the MFHD record.
|
| 866 receipt | Win+F6 |
For acquisition multipart & serial receipts: enters 866 with BLANK indicators.
Position cursor in any cell of preceding field or in selection column of preceding field.
|
| 866 receiptrev | No Activation |
For acquisition multipart & serial receipts: inserts 866 with BLANK indicators below 852.
Cursor can be anywhere in the MFHD record.
|
| 900 del (not 950) | Ctrl+F9 |
Deletes all 9xx fields except 950. Use to clean up vendor bibliographic records.
Use either prior to exporting (saving) vendor record into Orbis or on vendor records already in Orbis.
DO NOT USE ON CATALOGED RECORDS
|
| Change Template: Books [Cartographic, CDAudio, CDROMs, DVD, Map, Microfilm, Serials, Videocassette | No Activation | 8 separate macros. Changes the bibliographic record template to the selected format and creates a new record from the new template. |
| Frontlog | No Activation |
From the Circ. Module, prompts for item record barcode number. When barcode is wanded, overrides the 2 prompts and saves the charge. Toggles up the Cataloging Module, retrieves the MFHD, pastes UNCAT in 852 ‡h and prompts for Frontlog barcode number. When the Frontlog number is wanded, pastes in the number after UNCAT and saves the new UNCAT number to the database. Toggles up the Circ. Module and prompts for the next item record barcode number.
1. Circ. Module and Cataloging Module must be running. No windows may be running in the Cataloging Module. The macro will not run if the item is already charged to the same patron code.
2. Begin in the Circ. Module. Enter the appropriate patron code and start the macro. A window will open prompting for the item barcode number. (While the macro is running, a running figure will replace the Macro Express icon in the Start tray at the bottom of the Windows display.)
3. Wand the item record barcode number. The program will enter both overrides and save the item record to the new status (dummy patron), toggle up the Cataloging Module, retrieve the item record and use it to bring up the MFHD, paste UNCAT into 852 ‡h, and open a window prompting for the Frontlog barcode number: Please enter UNCAT number. Or, enter "l" to change to "smllnb" or "a" to "art" from "sml"
4. The default location in 852 ‡b is sml. If sml is the correct location, wand the Frontlog barcode. The program will paste the number after UNCAT, save the MFHD to the database, close all open windows within the Cataloging Module, toggle up the Circ. Module, and re-open the window prompting for the next item record barcode number.
5. To abort the macro, right click on the icon of the running figure in the Start tray at the bottom of the main window. The figure will be replaced by the Macro Express icon.
6. The current macro runs on the condition that 852 is the first variable field in the MFHD. If there are 014 fields in the MFHD, the macro will hang up at that point. To continue, close the error message window and wand the Frontlog barcode. Then re-start the macro. The MFHD with UNCAT<Frontlog number> will be saved, and the program will toggle up the Circ. Module and open the prompt for the next item record barcode charge.
|
| Frontlog art | No Activation | DO NOT EDIT OR DISABLE. Used by the Frontlog macro. (Replaces default sml location with art location) |
| Frontlog lnb | No Activation | DO NOT EDIT OR DISABLE. Used by the Frontlog macro. (Replaces default sml location with smllnb location) |
| MFHD In Process | Alt+Shift+F8 | Inserts ‡h In Process after ‡b <location>. Note this deletes all text after <location>. |
| MFHD On Order | Ctrl+Alt+F8 | Same as 852 On Order, but mapped to a HotKey. |
| POPUP ACQ | Popup Menu F12 |
Heavily used Acquisitions macros.
Position cursor where specific macro requires. Press function key to open the PopUp menu. With mouse, doubleclick on the appropriate macro to run it. Or type the number or letter in the column to the left of the macro nickname to run it.
Macro does not require an activation (hotkey) to run from the PopUp menu.
To change macros on the menu, double click on the PopUp Menu line in the macro list and click on the directional arrows to move or remove macros. You will be prompted to save any reconfiguration.
DISABLED.
|
| SUPPRESSED CIE | Ctrl+Shift+F7 |
On 852, types 8 0 as first and second indicators and inserts ‡k Suppressed ‡h CIE ‡x Use MFHD after ‡b <location>.
Cursor can be anywhere in the MFHD record.
|
| SUPPRESSED DESK COPY | Ctrl+Shift+F4 |
On 852, types 8 0 as first and second indicators and inserts ‡k Suppressed ‡h Desk Copy after ‡b <location>.
Cursor can be anywhere in the MFHD record.
|
| SUPPRESSED EXCHANGE | Ctrl+Shift+F11 |
On 852, types 8 0 as first and second indicators and inserts ‡k Suppressed ‡h Exchange after ‡b <location>.
Cursor can be anywhere in the MFHD record.
|
| SUPPRESSED LOST SML | No Activation |
On 852, types 8 0 in first and second indicators, replaces ‡b <location> with ‡b withdrawn ‡k Suppressed and inserts at the end of field 852 staff note ‡x sml: LOST mm/yy team/staff.
Cursor can be anywhere in the MFHD record.
|
| SUPPRESSED OP | Ctrl+Shift+F10 | On 852, enters 8 0 in first and second indicators and inserts ‡k Suppressed ‡h OP after ‡b <location>. Cursor can be anywhere in the MFHD record. |
| SUPPRESSED RETURNED | Ctrl+Shift+F9 |
On 852, types 8 0 in first and second indicators and inserts ‡k Suppressed ‡h Returned after ‡b <location>.
Cursor can be anywhere in the MFHD record.
|
| SUPPRESSED WITHDRAWN SML | Ctrl+Shift+F5 | On 852, enters 8 0 in first and second indicators, replaces ‡b <location> with ‡b withdrawn ‡k Suppressed and inserts at the end of field 852 staff note ‡x sml: WITHDRAWN mm/yy team/staff. Cursor can be anywhere in the MFHD record. |
| CIRCULATION FOLDER | ||
| Bound-With Linking | Win+Alt+L | 1. Retrieve all unlinked Bibliographic records you want to link to one MFHD/Item Record. All other records must be closed. 2. Retrieve the Bibliographic record for the first title. It must be on top and maximized. 3. Get holdings to retrieve the MFHD for the bound-with. 4. Get item record to retrieve the Item Record for the bound-with. 5. Run the macro. NOTE: The macro will make errors or fail if you try to do anything else on your computer while it is running. DISABLED. |
| Bulk Relinking | Win+Alt+I | 1. Copy the MFHD ID of the target MFHD using Ctrl-F2, or write the number down. 2. Open the originating holdings record. 3. Check for associated item records and count the number to relink. If you only want to relink some of the item records, rearrange them so they are the first ones on the list when you "get items". 4. Run the macro. 5. You are prompted to enter the holdings record id of the target MFHD. 6. You are then prompted to enter the number of item records that need to be relinked. 7. The macro then opens up the first item record, relinks it to the target holdings record, closes it, and repeats. It repeats the same number of times as the number entered in 6. NOTE: The macro will fail if you try to do anything else on your computer while it is running. DISABLED. |
| Charge to Prep (CIRC MODULE) | F7 | CIRC MODULE ONLY. Used primarily by units that employ dummy patron codes for status tracking. Automatically opens the Charge window with the unit's PrepTeam patron code. Prior to use, the appropriate digits for the unit's PrepTeam code must be entered. TO PERFORM THE UPDATE: Double click on the Charge to Prep line in the MacroExpress macro list. Then find Text Type: PRPTM**** in the Macro Script window and double click on that line of the script. Replace the asterisks with the appropriate digits. Click OK button, then Click on the Macro Explorer icon in the Actions window. When prompted to save, click OK. May be cloned or edited for other heavily used patron charges. |
| Item Copy 0 | Win+Alt+0 | Changes the Item Record copy number to 0 <zero> and saves the record. |
| LSFC Item Type | No Activation | Changes Item Record item type to LSFC. CAUTION: should only be used by technical services units authorized to change item types to LSF, e.g. Divinity. Should NOT be used by SML Cataloging units. |
| LSFR Item Type | No Activation | Changes Item Record item type to LSFR. SEE CAUTION ABOVE. |
| New Barcode | Alt+Up Arrow | Replaces Item Record barcode with new barcode. Open item record, run macro, scan in new barcode into Barcodes pop-up. NOTE: Don't use if you want to keep old barcode as Inactive since macro deletes old barcode. Works only if laser gun or wand automatically includes Enter at end of scan. |
| New Item | Ctrl+F7 | Creates a new item record from the MFHD. CAUTION: can also create a new item record from the Bib record. |
| Override (CIRC MODULE) | F1 | CIRC MODULE ONLY. Automatically overrides the 2 Voyager dialog boxes evoked whenever an item is charged or discharged, up to 100 items. The maximum number of charges can be edited. The macro should be turned on after the patron charge has been entered or after the discharge window has been opened. Once the macro is running, wanding the barcode will automatically charge or discharge the item and prompt for the next barcode.The macro is running when an icon of a running figure replaces the standard MacroExpress icon in the start-up tray. CAUTION: this macro does not close until the maximum number of charges is reached, the user aborts the macro, or the macro times out (about 2 min. without activity). Until the macro closes, no other macros may be run. To abort the macro, right click on the running figure icon. |
| Reference Item Type | No Activation | Changes Item Record item type to Reference, then puts cursor in Enum. |
| Relink One Item | Ctrl+F3 | Brings up relink item to a different holding pop-up from Item Record. |
| EDIT FOLDER | ||
| 006ebooks | Win+Alt+F5 | Creates standard 006 for ebooks. Conditions: no existing 006. Cursor can be anywhere in the bib record. |
| 006eserials | Win+Alt+F7 | Creates standard 006 for eserials. Conditions: no existing 006. Cursor can be anywhere in the bib record. |
| 007ebooks | Win+Alt+F8 | Creates standard 007 for ebooks. Conditions: no existing 007. Cursor can be anywhere in the bib record. |
| 007eserials | Win+Alt+F10 | Creates standard 007 for eserials. Conditions: no existing 007. Cursor can be anywhere in the bib record. |
| 007microfilmserials | Win+Alt+F7 | Creates standard 007 for microfilm serials. Conditions: no existing 007. Cursor can be anywhere in the bib record. |
| 008ebooks | Win+Alt+F9 | Creates standard 008 for ebooks. Conditions: Existing 008. Cursor can be anywhere in the bib record. |
| 040 | Ctrl+F12 | Inserts 040 __CtY‡cCtY above the field selected. Position cursor in any cell of succeeding field or in selection column of succeeding field. Modify MARC21 location code if necessary. |
| 040 Delimiter d CtY | Shift+F12 | Adds ‡d CtY to 040 field. Postion cursor anywhere in variable portion of 040 EXCEPT the beginning of the field. (Will delete first variable field if cursor is positioned at the beginning of the 040 field). Modify MARC21 location code if necessary. |
| 504 Bibliographical | Ctrl+F8 | Creates 504 __ Includes bibliographical references and indexes. Position cursor in the preceding variable field. DISABLED. |
| 504 Bibref with ( ) | Ctrl+F8 | Creates 504 __ Includes bibliographical references (p. [ ]- ) and index. Position cursor in the preceding variable field. |
| Erase End of Field | Shift+Delete |
Deletes all text to the right of the cursor in variable fields (i.e., Bib or MFHD variable fields, and most text fields in the Item Record).
NOTE: current setting restricts use to the Cataloging Module.
|
| Fixed Field Default | Alt+Down Arrow |
Replaces pipe character <no attempt to code> with default fixed field values in bibliographic records.
Open 008 and position the cursor on first fixed field to be changed. Hold down Alt, press the Down Arrow, and release both keys. The macro adds the default value and moves to the next line.
NOTE: Use mouse or down arrow to skip lines that don't have a pipe character. The macro will NOT work correctly if run on a fixed field containing some other value.
Also works with pipe characters in 006 and 007 fixed fields. It does NOT work with the Leader.
|
| LGBTQresource | Win+Alt+F12 | Enters the LBGTQ local subject. Condition: Position cursor in the preceding variable field. |
| RDAFields | Win+Alt+R | Enters 300 and 3xx fields for books. Condition: Position cursor in the preceding variable field. |
| SwitchNODIACRITICS or SwitchDIACRITICS | Ctrl+Keypad 5 |
Default setting changes the macro express file from the diacritics+function keys file to the function keys only file. The key sequence will toggle between the two files.
The file names need to be edited if the workstation default files are not the ones used in the macro.
Switching to the function-key only file allows use of the number pad for numbers.
|
| videorecording gmd | No Activation | Inserts text for 245 gmd: ‡h[videorecording]. Position cursor at the end of 245 ‡a. |
| MFHD FOLDER | ||
| 050 ‡h and ‡i with X | Ctrl+Alt+F12 |
For units that use trailing X with 050 00. For units that follow SML practice, this macro is only used if the 050 number does not get (LC) in 852. Preferences must be set to copy number from 050. Copies 050 (or 090 in the absence of 050) to 852 and adds X at the end of the last cutter. 050 00 only. 050 number must have date at the end, and there should be no ‡x or ‡z subfields in 852. Cursor can be anywhere in the MFHD record. Note: the use of Trailing X has been discontinued (November 30, 2016) |
| 050 ‡h and ‡i with X (LC) and Oversize | Ctrl+Alt+F10 |
For units that use trailing X with 050 00. For units that follow SML practice, this macro is only used if the 050 number gets (LC) in 852. Preferences must be set to copy number from 050. Copies 050 (or 090 in the absence of 050) to 852, adds X at the end of the last cutter, pastes (LC) at the end, adds + and ‡m Oversize. 050 00 only. 050 number must have date at the end, and there should be no ‡x or ‡z subfields in 852. Cursor can be anywhere in the MFHD record. Note: the use of Trailing X has been discontinued (November 30, 2016) |
| 050 ‡h and ‡i with X and (LC) | Ctrl+Alt+F5 |
For units that use trailing X with 050 00. For units that follow SML practice, this macro is only used if the 050 number gets (LC) in 852. Preferences must be set to copy number from 050. Copies 050 (or 090 in the absence of 050) to 852, adds X at the end of the last cutter, and pastes (LC) at the end. 050 00 only. 050 number must have date at the end, and there should be no ‡x or ‡z subfields in 852. Cursor can be anywhere in the MFHD record. Note: the use of Trailing X has been discontinued (November 30, 2016) |
| 050 ‡h and ‡i with X and Oversize | Ctrl+Alt+F7 |
For units that use trailing X with 050 00. For units that follow SML practice, this macro is only used if the 050 number does not get (LC) in 852. Preferences must be set to copy number from 050. Copies 050 (or 090 in the absence of 050) to 852, adds X at the end of the last cutter, and + ‡m Oversize at the end of the call number. 050 00 only. 050 number must have date at the end, and there should be no ‡x or ‡z subfields in 852. Cursor can be anywhere in the MFHD record. Note: the use of Trailing X has been discontinued (November 30, 2016) |
| 866 | Shift+F6 | Inserts new 866 41 ‡8 0 ‡a field below existing variable field in MFHD. Position cursor in any cell of preceding field or in the selection column of the field that will precede the new 866 field. |
| 866rev | No Activation | Inserts new 866 41 ‡8 0 ‡a field below existing variable field in MFHD. Cursor can be anywhere in the MFHD record. |
| Bound with Z | No Activation | On 852 inserts bound-with public note ‡zThe following titles are bound together: at the end of field. |
| Bound with Z (# other) | No Activation | On 852 inserts bound-with public note ‡zBound with other titles. at the end of field. |
| CIE ON MFHD REFERENCE | Ctrl+Shift+F8 |
On 852, types 8 0 as first and second indicators and inserts staff note ‡x CIE on MFHD after the call number.
Cursor can be anywhere in the MFHD record.
|
| (LC) | Shift+F4 |
On 852, adds (LC) to the end of the call number. Run after the basic call number has been entered into 852 ‡h and ‡i.
Cursor can be anywhere in the MFHD record.
|
| (LC) with X | Ctrl+Alt+F4 |
On 852, adds trailing X to the end of the last cutter and (LC) to the end of the call number. Run after the basic call number has been entered into 852 ‡h and ‡i. 050 00 only. 050 number must have date at the end, and there should be no ‡x or ‡z subfields in 852.
Cursor can be anywhere in the MFHD record.
|
| MFHD Local Yale | No Activation |
On 852, adds first indicator 8, second indicator 0, adds blank ‡h and ‡i. Run before the call number is entered into 852, since macro will delete everything after ‡b <location>.
Cursor can be anywhere in the MFHD record.
|
| MPM Class Together | No Activation |
On 852, inserts public note ‡z Shelved by the volume number of the main series.
Cursor can be anywhere in the MFHD record.
|
| New Hldg | Ctrl+F6 | Creates a new MFHD. Cursor can be anywhere in an activated bibliographic record. |
| Oversize (LC) | Shift+F5 |
On 852, adds (LC)+ ‡m Oversize to the end of the call number. Run after the basic call number has been entered into 852 ‡h and ‡i. Cursor can be anywhere in the MFHD record.
|
| Oversize (LC) with X | Ctrl+Alt+F11 |
For units that use trailing X with LC 050 00. For units that follow SML practice, this macro is only used if the 050 number gets (LC) in 852. 050 number must already be copied to 852; call number must have date at the end. Adds X to the end of the last cutter and + ‡m Oversize to the end of the call number. (Used only for 050 00) Note: the use of Trailing X has been discontinued (November 30, 2016) |
| Oversize without (LC) | Ctrl+F5 |
On 852, adds + ‡m Oversize at the end of the call number. Run after the basic call number has been entered into 852 ‡h and ‡i. Cursor can be anywhere in the MFHD record.
NOTE: Only use for LC classification.
|
| Oversize X without (LC) | Ctrl+Alt+F9 |
For units that use trailing X with LC 050 00. For units that follow SML practice, this macro is only used if the 050 number does not get (LC) in 852. 050 number must already be copied to 852; call number must have date at the end. Adds X to the end of the last cutter and + ‡m Oversize to the end of the call number. (Used only for 050 00) Note: the use of Trailing X has been discontinued (November 30, 2016) |
| Trailing X | Ctrl+Alt+F3 |
For units that use trailing X with LC 050 00. For units that follow SML practice, this macro is only used if the 050 number does not get (LC) in 852. 050 number must already be copied to 852; call number must have date at the end. Adds X to the end of the last cutter. (Used only for 050 00) Note: the use of Trailing X has been discontinued (November 30, 2016) |
| NAVIGATE FOLDER | ||
| Cascade windows | Win+Alt+C | Cascades windows in the Cataloging Module. |
| Close all records | Ctrl+F1 | Closes all open windows in the Cataloging Module. |
| Get Bib from MFHD or Item Record | F6 | From MFHD, opens the Bib record; from Item record, opens the Bib record. Troubleshooting: if the macro aborts at the beginning of the session, maximize the window and run the macro again; macro should be stable for the rest of the session and window can be normalized thereafter. |
| Get Item from Bib or MFHD | Shift+F7 | Retrieves item record(s). |
| Get MFHD from Bib or Item Record | F5 | From Bib or Item record, opens MFHD or MFHD dialog box |
| Hierarchy | Win+Alt+H | Opens the Hierarchy window in the Cataloging Module. |
| Next Title (subsequent times) | Shift+Insert | Use after running Shift+F9 to open subsequent windows. Opens the window of the subsequent title from the title list and closes the top window. |
| Previous Title (subsequent times) | Ctrl+Insert | Use after running Shift+Insert to open previous windows. Opens the window of the previous title from the title list and closes the top window. |
| Tile Windows | Win+Alt+T | Tiles windows in Cataloging Module. |
| OTHER FOLDER | ||
| Call number index-lc | Alt+C | Selects Call Number (LC) index in the Orbis OPAC. Works in Internet Explorer & Firefox. |
| Call number index-lc (enter) | Alt+C | DISABLED. Selects Call Number (LC) index in the Orbis OPAC and enters search. Works in Internet Explorer & Firefox. |
| Call number index-local | Alt+C |
DISABLED. Selects Call Number (Local) index in the Orbis OPAC and enters search. Works in Internet Explorer & Firefox.
Use at the beginning of the session or to change indexes after using a different index during the session. Works whether or not text has been entered in Search for:
This is an alternate to the default Alt+C macro. To use, the default macro must be disabled, and this one enabled.
|
| Copy Bib ID | No Activation |
Copies Bib ID of active bibliographic record.
DO NOT USE: Use Ctrl+F2 instead.
DO NOT EDIT OR DISABLE: Used by other macro.
|
| Copy Item ID | No Activation |
Copies Item ID of active item record.
DO NOT USE: Use Ctrl+F2 instead.
DO NOT EDIT OR DISABLE: Used by other macro.
|
| Copy MFHD ID | No Activation |
Copies MFHD ID of active holdings record.
DO NOT USE: Use Ctrl+F2 instead.
DO NOT EDIT OR DISABLE: Used by other macro.
|
| Copy Record ID | Ctrl+F2 |
Copies ID of active record to Windows clipboard. Works with bibliographic, holdings, and item records in cataloging module only.
Run macro then paste ID into any program that allows pasting, e.g. Voyager and Eudora.
DO NOT EDIT OR DISABLE: Used by other macro.
|
| Delete Record | Alt+Delete |
Deletes active record. Run macro and select Yes to delete.
Works with bibliographic, holdings, and item records in cataloging module, but only for those record types that user has permission to delete.
DISABLED.
|
| Display Label | Win+Z | Displays Print Label window. Default Voyager configuration displays different information for each type of record. Label configuration may be changed so that Print Label includes only record ID's. |
| Retrieve Authorities | KeyPad / | If a bibliographic record is open in the Cataloging Module, opens the Retrieve Authorities window. |
| SAR | Ctrl+S | OCLC CONNEXION ONLY. Opens blank authority record workform and applies constant data. |
| SEARCH & IMPORT FOLDER | ||
| Barcode | F7 | Opens Retrieve Barcode window. |
| Capture Search by | No Activation | DO NOT EDIT OR DISABLE. Used by other macro. |
| EAN to ISBN (Cat Module, Acq Module, OCLC Connexion) | Ctrl+F10 | Converts EAN barcode number to ISBN format. Works in Cat Module, Acq Module, OCLC Connexion. Position cursor where the ISBN number is to be entered. Run macro to bring up the EAN converter window and scan the barcode. The macro will then change the EAN number to ISBN format and enter it where the cursor is positioned. If there is an Unable to Convert message, try again; sometimes the laser wand or gun misfires. |
| Go to Search for Box | No Activation | DO NOT EDIT OR DISABLE. Used by other macro. |
| Headings | Shift+F2 | Opens Headings window. (Headings icon on toolbar must be activated). |
| Import File OCLC and map | Shift+F11 | Opens OCLCimp file and remaps character set to OCLC import type. |
| LCDB Connect | Shift+F10 |
Opens Search window with remote connection to LCDB only. Note: obsolete |
| LCDB Disconnect/ORBIS Connect | F10 |
Opens Search window in Orbis; disconnects remote connection to LCDB or LCDB/Orbis. Note: obsolete |
| Map MARC21 MARC 8 (non-unicode) | No Activation | Sets character set import preferences to non-Unicode file type MARC21 MARC8 (non-unicode). FOR USE ONLY by staff who switch between importing Unicode and non-Unicode records. |
| Map MARC21 UTF-8 | No Activation | Sets character set import preferences to Unicode import file type MARC21 UTF-8. FOR USE ONLY by staff who switch between importing Unicode and non-Unicode records. |
| Retrieve Record ID (Auth) | Alt+Keypad* | In the Cataloging Module, opens the Retrieve a Record window, defaulted to the retrieval of the Authority Record. |
| Retrieve Record ID (Bib) | Shift+Keypad* | In the Cataloging Module, opens the Retrieve a Record window, defaulted to the retrieval of the Bibliographic Record. |
| Retrieve Record ID (Holdings) | Ctrl+Keypad* | In the Cataloging Module, opens the Retrieve a Record window, defaulted to the retrieval of the MFHD Record. |
| Search | Alt+/ | Opens Search window in either Orbis or LCDB. |
| Search [LCDB] local subjects, etc. | No Activation |
39 macros corresponding to the search indexes used in Voyager. User can either map the most heavily used searches to a hotkey (each key has a default activation beginning Alt+Shift+<alpha>). Alternatively, user can add to one of the popup menus, or create a separate popup menu, and then run from the popup menu. Note: obsolete |
| Titles | Shift+F3 | Opens Titles window. (Titles icon must be activated on the toolbar). |
Last rev.: 01/22/2015
Diacritics and Special Characters with Macro Express
These are the keys to which diacritics and special characters are mapped in Voyager according to the WINDOWS ALA KEYBOARD MAP when MACROEXPRESS is turned on. The most frequently used diacritics are on the number pad and are entered at NORMAL or (generally) ALT.* For alternate characters mapped to the keyboard, note that most sequences begin with either CTRL ALT or CTRL ALT SHIFT, corresponding to normal and shift on the keyboard map. If a key sequence was already claimed by a MACROEXPRESS system macro, the sequence will usually begin with WIN ALT.
For NACO and non-roman script contributors, characters mapped to the number pad are also mapped to the key sequence used in Connexion. In Voyager, the character appears only after you release the keys used in a key sequence. Frequently used diacritics may also be entered through a menu window (F12). You can also evoke a supermenu, a menu listing ALL macros on the *.mex file in use with the key sequence Ctrl + Alt + Shift + z. To enter any character (or run any macro) listed on a menu, doubleclick on any menu entry (or press the letter or number to the left of the entry); this will also close the menu.
*You can use the number pad without turning off MACROEXPRESS by holding down the WIN key before pressing a number key on the keypad. If you have both the diacritics.mex and functionkey.mex files loaded in Program Files>Macro Express, Ctrl + Keyboard 5 allows you to switch files. So, if you are using diacritics.mex and want to use the keypad to enter numbers temporarily, press Ctrl + Keyboard 5 to switch to the functionkey.mex file, where diacritics are not mapped to the keyboard.
| DIACRITIC/SPECIAL CHARACTER | KEY SEQUENCE | LANGUAGES |
| AE Æ upper case æ ae lower case |
CTRL ALT SHIFT q CTRL ALT q |
Anglo-Saxon, Danish, Icelandic, Norwegian, Thai |
| acute | up arrow (8) on number pad,or,
CTRL ALT o |
Afrikaans, Albanian, Arabic, Assamese, Bengali, Catalan, Croatian, Czech, Dutch, French, Gujarati, Hawaiian, Hindi, Hungarian, Icelandic, Kannada, Malayalam, Marathi, Oriya, Persian, Pinyin, Polish, Portuguese, Prakrit, Pushto, Sanskrit, Serbian, Sinhalese, Slovak, Slovene, Spanish, Tagalog, Tamil, Telegu, Tibetan, Vietnamese, Wendic |
| alif |
ALT 2 on number pad, or, CTRL ALT f |
Arabic, Assamese, Bengali, Gujarati, Hebrew, Hindi, Indonesian, Korean, Japanese, Malayalam, Marathi, Oriya, Persian, Prakrit, Sinhalese, Tibetan, Turkish, Urdu |
| alpha, lower case | CTRL ALT a | |
| angstrom or circle above | ALT 3 on number pad, or, CTRL ALT SHIFT / |
Czech, Danish, Finnish, Norwegian, Slovak, Swedish NOTE: for degree sign use superscript zero NOT angstrom |
| ayn | CTRL 2 on number pad, or, CTRL ALT d |
Arabic, Armenian, Chinese, Hebrew, Korean, Persian, Pushto, Sindhi, Thai, Urdu |
| beta, lower case | CTRL ALT b | |
| breve | ALT number pad 9,or, CTRL ALT SHIFT . <period> |
Bulgarian, Esperanto, Hindi, Korean, Punjabi, Romanian, Russian, Turkish, Ukrainian, Vietnamese, White Russian |
| British pound | ALT SHIFT z | _ |
| candrabindu | CTRL ALT ; | Assamese, Bengali, Bulgarian, Hindi, Oriya, Prakrit, Sanskrit, Telegu, Tibetan |
| cedilla | 6 on number pad, or, CTRL ALT h |
Albanian, Catalan, French, Latvian, Portuguese, Turkish |
| circle above see angstrom |
||
| circle below | 3 on number pad, or, CTRL ALT / |
Assamese, Bengali, Gujarati, Hindi, Kannada, Malayalam, Marathi, Oriya, Prakrit, Sanskrit, Sinhalese, Telegu, Tibetan |
| circumflex | 4 on number pad,or, CTRL ALT SHIFT p |
Afrikaans, Albanian, Dutch, Esperanto, French, Gujarati, Hindi, Marathi, Portuguese, Romanian, Sinhalese, Slovene, Tagalog, Telegu, Turkish, Vietnamese |
| copyright symbol © | CTRL ALT c | Used in RDA cataloging |
| D with cross bar Ð upper case ð lower case |
WIN ALT w CTRL ALT w |
Croatian, Serbian, Vietnamese |
| dagger | WIN ALT v | |
| degree | Use superscript zero (LCRI 1.0E) | NOTE: Voyager assigns Shift F1 but does not appear to be activated |
| dot above | ALT 1 on number pad, or, CTRL ALT SHIFT n |
Assamese, Bengali, Gujarati, Hebrew, Hindi, Kannada, Lithuanian, Malayalam, Marathi, Oriya, Polish, Punjabi, Pushto, Russian, Sanskrit, Sindhi, Sinhalese, Tamil, Telegu, tibetan, Turkish, White Russian |
| dot below | 1 on number pad, or, CTRL ALT n |
Arabic, Assamese, Bengali, Burmese, Gujarati, Hebrew, Hindi, Kannada, Malayalam, Marathi, Oriya, Persian, Prakrit, Punjabi, Pushto, Sanskrit, Sindhi, Sinhalese, Tamil, Telegu, tibetan, Urdu, Vietnamese |
| dot at mid-line | CTRL 9 on number pad, or, CTRL ALT SHIFT b |
Catalan |
| double acute | ALT 8 on number pad, or, CTRL ALT SHIFT o |
Hungarian |
| double dot below | * on number pad, or, CTRL ALT m |
Hindi, Kannada, Persian, Pushto, Sindhi, Urdu |
| double tilde first half double tilde second half |
- on number pad, or, CTRL ALT k CTRL - on number pad, or, |
Tagalog |
| double underscore | CTRL ALT ' <apostrophe> | _ |
| eth | CTRL ALT v | Anglo-Saxon, Icelandic |
| foot/feet | USE miagkii znak (LCRI 1.0E) | _ |
| gamma | CTRL ALT SHIFT c | |
| grave | 2 on number pad, or, CTRL ALT ` |
Afrikaans, Catalan, Dutch, French, Italian, Pinyin, Portuguese, Tagalog, Vietnamese |
| hacek | ALT 4 on number pad, or, CTRL ALT p |
Armenian, Croatian, Czech, Latvian, Lithuanian, Macedonian, Pinyin, Serbian, Sinhalese, Slovak, Slovene, Thai, Wendic |
| high comma centered | + on number pad, or, CTRL ALT SHIFT ' <apostrophe> |
Latvian |
| high comma off center | CTRL + (number pad), or, CTRL ALT SHIFT ; <semicolon> |
Czech, Macedonian, Navaho, Serbo-Croatian (Roman), Slovak, Slovene, Wendic |
| hook, left | CTRL ALT SHIFT h | Latvian, Romanian |
| hook, right | CTRL ALT SHIFT j | Anglo-Saxon, Lithuanian, Polish |
| hooked o upper case lower case |
CTRL ALT SHIFT t CTRL ALT t |
Vietnamese |
| hooked u upper case lower case |
CTRL ALT SHIFT i CTRL ALT i |
Vietnamese, Thai |
| Icelandic thorn Þ upper case þ lower case |
CTRL ALT SHIFT u CTRL ALT u |
Anglo-Saxon, Icelandic |
| inches | USE tzverdii znak (LCRI 1.0E) | _ |
| inverted ¿ [inverted question mark] | WIN ALT q | Added to ALA character set & compatible w/MARC-8 (as well as MARC UTF 8) |
| inverted ¡ [inverted exclamation point] | WIN ALT e | Added to ALA character set & compatible w/MARC-8 (as well as MARC UTF 8) |
| (slashed) l see Polish l | _ | _ |
| (script) ℓ | CTRL ALT Shift Period | _ |
| ligature first half second half |
0 on numberpad, or CTRL ALT SHIFT k ALT 0 on numberpad, or, |
Russian, Ukrainian, White Russian |
| macron | 9 on number pad, or, CTRL ALT SHIFT , <comma> |
Anglo-Saxon, Arabic, Armenian, Assamese, Bengali, Burmese, Greek (Modern), Gujarati, Hindi, Japanese, Kannada, Korean, Latvian, Lithuanian, Malayalam, Marathi, Oriya, Persian, Prakrit, Punjabi, Pushto, Russian, Sanskrit, Sindhi, Sinhalese, Tamil, Telegu, Thai, Tibetan, Urdu |
| miagkii znak (also: foot/feet; minutes) |
CTRL ALT g | Arabic, Bulgarian, Hebrew, Persian, Pushto, Russian, Tibetan, Ukrainian, White Russian |
| minutes (geo. coordinates) | USE miagkii znak (LCRI 1.0E) | _ |
| musical flat | CTRL ALT x | |
|
O (Scandinavian) ø lower case |
CTRL ALT SHIFT quotes Default key sequence not working on Connexion CTRL ALT 2 |
Danish, Norwegian |
| OE upper case lower case |
CTRL ALT SHIFT r CTRL ALT r |
Anglo-Saxon, French, Icelandic, Thai |
| Patent symbol | CTRL ALT SHIFT s | |
| Plus minus | CTRL ALT SHIFT \ | |
| Polish L upper case [Ł] lower case [ł] |
CTRL ALT e CTRL ALT shift e |
Polish, Wendic |
| Pseudo question mark | CTRL ALT SHIFT ` <grave/tilde key under the ESC key> | Vietnamese |
| script ℓ | CTRL ALT SHIFT PERIOD | |
| seconds (geo. coordinates) | USE tzverdii znak (LCRI 1.0E) | |
| sound recording copyright [℗] | WIN ALT p | Used in RDA cataloging |
| superior dot see dot above |
||
| superscript & subscript numbers | subscript: CTRL ALT <number on regular keyboard> superscript: CTRL ALT SHIFT <number on keyboard> |
|
| superscript + superscript - superscript ( |
CTRL ALT SHIFT = <= on keyboard> CTRL ALT SHIFT - <minus on keyboard> CTRL ALT SHIFT [ <bracket on keyboard> CTRL ALT SHIFT ] <bracket on keyboard> |
|
| subscript + subscript - subscript ( subscript ) |
CTRL ALT - <hyphen on keyboard> CTRL ALT SHIFT 6 CTRL ALT [ CTRL ALT ] |
|
| thorn Þ upper case þ lower case |
CTRL ALT SHIFT u CTL ALT u |
Icelandic |
| tilde | 5 on number pad, or, CTRL ALT \ |
Assamese, Bengali, Estonian, Gujarati, Hindi, Kannada, Malayalam, Marathi, Oriya, Portuguese, Prakrutm Punjabi, Sanskrit, Sindhi, Sinhalese, Spanish, Tamil, Telegu, Tibetan, Vietnamese |
| Turkish i | CTRL ALT s | Turkish |
| tverdii znak (also inches; seconds) |
CTRL ALT SHIFT g | Bulgarian, Russian |
| umlaut | 7 on number pad, or, CTRL ALT SHIFT m |
Afrikaans, Albanian, Catalan, Chinese, Dutch, Estonian, Finnish, French, German, Hungarian, Icelandic, Norwegian, Portuguese, Russian, Sindhi, Spanish, Swedish, Turkish, Ukrainian |
| underscore | CTRL ALT , <comma> | Assamese, Bengali, Hindi, Kannada, Malayalam, Persian, Prakrit, Punjabi, Pushto, Sanskrit Sindhi, Tamil |
| upadhmaniya | CTRL ALT . <period> | Sanskrit |
Macro Express 3.5: Checklist for Expert Users
Macro Express Expert User Checklist
CONTENTS
1. Installation -- 2. Master Files -- 3. Editing Master Files & the Voyager Import Path. 3.1. Charge to Prep. 3.2. IMPORT.DAT File in Voyager. 3.3. 040 -- 4. Importing Files -- 5. Exporting Files -- 6. "No Activation" -- 7. Popup Menus -- 8. Disable/Enable -- 9. Diacritics -- 10. Macro Express System Key Sequences -- 11. Training -- 12. Search Index Macros -- 13. Checklist for Creating New Macros -- 14. Aborting -- 15. Help
1. Installation.
The Macro Express software is usually pre-loaded and pre-registered on technical services workstations configured by SML WTS (Workstation & Technology Services). Significant updates to the Macro Express files or to the program itself are not done to individual workstations, but are pushed out by WTS to all technical services workstations.
In the standard WTS configuration, Macro Express will be included in the Start Up folder. Macro Express will start automatically when logging in to the staff member's account. Under the default configuration, the splash screen, text window, and program window are suppressed at start up, so it will not be obvious that the program is running in the background. To edit MacroExpress, open the Hidden Icons tray and click on the MacroExpress icon to display the text window. Although there may be a MacroExpress icon on the Start Menu, clicking on it will not open the program for editing.
Troubleshooting. If Macro Express is not in the Start Up folder, the expert user will need to set the Preferences or instruct staff in how to do so. Options-->Preferences-->Startup <last item in the list>-->Check "Run on Windows Startup" (all other options should be unchecked).
Troubleshooting. If Macro Express has not been pre-registered at the time of installation, it is only usable for a trial period of about a month. If the program stops working, check to see whether it has been registered. TIP: To register manually, click on Help and select License Information; enter Yale University Library under User Name; obtain the registration number from the WTS liaison or copy the number from a registered program.
Ensure that when the Macro Express window is open, Open File opens in C:\Program FilesStaff (x86)\MacroExpress 3. If a master file does not display in the staff member'sMacroExpress window, click on Open File and double-click on the appropriate master file to enable. who currently lack Macro Express: staff member will need to decide which master file to enable. See 2. below for details. Expert user may need to show or help the staff member to enable the appropriate file. To enable a macro file:
- Click on the Folder icon on the Toolbar (or use File-->Open Macro File
- Verify that the "Look in" is Macro Express3
- Doubleclick on MASTER<version #>D.mex or MASTER<version #>N.mex (or click once and click the Open button). Whichever file is "Open" becomes the enabled file; only macros in the Open file can be used.
In the Macro Express 3 folder there will be at least 2 master files: MASTER<version #>D.mex and MASTER<version #>N.mex. Keep both files. Be sure the most current version is being used, but do not automatically delete the earlier version, if there, in case there are individually customized macro that need to be transferred to the current versions. To avoid confusion, be sure that these master files are kept in Program Files-->Macro Express 3. The ...D.mex file has all the function key macros included on ...N.mex file plus the full set of diacritics.
If a new staff member takes over a workstation, WTS generally re-images the workstation and all of the programs revert to their default configurations. Make sure the re-imaged version has the current Macro Express files.
NUMBER PAD/MASTER File Toggle. On the ...D.mex file, heavily used diacritics are mapped to the number pad roughly corresponding to the old NOTIS keyboard, as well as to the regular keyboard. If the ...D.mex file is being used, you can turn off the diacritics on the number pad by holding down the WIN key. Alternatively, you can switch to the ...N.mex file with the key sequence Ctrl+Number pad 5, since ...N.mex files do not have diacritics mapped to the number pad. Toggle back to the ...D.mex file with the same Ctrl+Number Pad 5.
3. Editing the Master Files in Macro Express and the Import Path in Voyager/Cataloging
3.1. Charge to Prep (F7) is provided for use in the Circulation module that will enter the most heavily used patron code (for Cataloging, this will be a specific Prep. Team patron code assigned to members of a team). This macro must be edited to include the appropriate patron code digits for the particular team. To edit,
3.1a. Find the macro in Macro Express edit. Click on the Nickname column to sort by name (Charge to Prep); or click on Activation to sort by key (F7).
3.1b. When the macro is found, double click on its listing. Under Macro Script in the right window, double click on Text Type: prptm****.
3.1c. Text type Keystrokes window will open. Replace the text prptm**** with the appropriate patron code for the unit you need to charge to. Click OK.
3.1d. Click on File Menu and click on Save.
3.1e. Test the macro in the Circulation module.
3.1f. Cataloging units may want to clone the macro and assign to different function keys for other heavily used patron code charges.
3.2. IMPORT.DAT FILE. Expert user needs to make sure there is an import.dat file in OCLCIMP. Make sure the oclc export path on OCLC Connexion is: c:\voyager\catalog\oclcimp\import.dat <NOT export.dat> Explanation: the macros to open the import files will be looking for the import.dat file. Note that the updated OCLC import file macros also map to the appropriate font before opening the import file.
3.3. 040 (Ctrl + F12) and Delimiter 040 (Shift + F12). If the cataloging unit does not use MARC21 code CtY, their expert user will need to add the appropriate code to the macro in both the ...D.mex and ...N.mex files as follows:
3.3a. Open the Macro Express window.
3.3b. Under the Nickname column find the macro listing for 040 or 040 Delimiter $d CtY and doubleclick on the listing.
3.3c. Two subwindows, Commands and Macro Script will open.
3.3d. Under Macro Script, find Text Type line with CtY and doubleclick on it.
3.3.e. Keystrokes window will open. Change the text to the appropriate MARC21 code.
3.3.f. Click the OK button at the bottom of the Keystrokes window, which will close.
3.3.g. Click on the Save icon on the Macro Express toolbar (or File-->Save)
3.3.h. Click on the Macro Explorer icon under the Actions column to return to the Macro list.
3.3.i. Minimize the Macro Express window.
3.3.j. Test the macro in the Cataloging Module.
Sometimes a particular macro is created and is not ready to be included in a WTS mass push-out. Macro files can be transferred via thumb drive or as attachments. Only files (*.mex) can be sent as attachments; macros themselves cannot be sent as attachments. (Double clicking on an attachment icon in an e-mail message will do nothing)
To import a macro from an e-mail attachment file:
4.1. In your e-mail, select the attached file's icon and open the selection menu to "Save As." Save the file to the Macro Express 3 folder.
4.2. You now need to import the file into the staff member's working master file (your target file). The target file should be open in Macro Express.
4.3. In the Macro Express editor, click on the Import Macros button on the toolbar; the Import Macro window will open. Find the Open File button at the foot of the window.
4.4. Click on Open File to open the Import Macro window, which should open in the Macro Express 3 folder.
4.5. Find the appropriate *.mex file and double click on it. The Import Macros window will open with the *.mex file listed in the formerly blank window.
4.6. Select the macro with your mouse. This will activate the Import button.
4.7. Click on the Import button. You will generally get a successful import message.
4.8. If an imported macro has the same activation (hot key) as a macro already in your target file, you will get a notification message. Click OK. The imported macro will import without an activation. You can either assign a different activation, or disable the macro with the conflicting activation and then assign that activation to your imported macro. (You would do the latter if the imported macro is a replacement for a previously existing macro.)
5. Exporting Files. If you create new macros, the export function allows you to create a file of macros of manageable size suitable for sending as an attachment. (Don't send the master files as attachments!)
5.1. Open the Macro Express file containing the macros to be exported.
5.2. Click on the Export Macro icon on the toolbar (or use File menu-->Export-->Export Macros). The Export Macos window will open.
5.3. With the mouse, select all macros to be exported, then click on the Save File button. The Export Macros To window will open (generally in the Macro Express folder; you probably want to save the file in this folder)
5.4. Assign a name to the file in File Name slot and click the Save button. (The file extension.mex should be provided automatically)
6. "No Activation." Some No Activation macros have very specific functions and staff may not want to utilize limited key assignments on them. Other No Activation macros are used in macro strings where a hotkey activation is not necessary. Most of the macros that change the search index are not enabled, but many of them have key sequences pre-assigned. If searching in various indexes is important, the appropriate hotkeys should be enabled as described under 12.
If the key is to be activated, the range Ctrl+Shift, Alt+Shift, or Win+Crl should be used (these ranges have been set aside for custom uses). To activate, i.e. assign to a hotkey:
6.1. Open the macro file, and with the mouse select and double-click on the macro to be activated. Usually the Script tab windows (Commands/Macro Script) will open. If so, change the display by clicking on the Properties tab. The Properties windows will open (General/Activation)
6.2. In the Activation window (right), click in the Hot Key box. This will enable the Set Hot Key button.
6.3. Click on the Set Hot Key button. The Set HotKey Activation window will open with a default hotkey value selected. Click OK unless a different hotkey is preferred.
6.4. Click on the Macro Explorer icon at the top of the far left column. You will be prompted to save the change. Click OK. (Or, click on the save icon on the toolbar)
Alternatively, you can add a No Activation macro to an enabled Popup Menu without assigning a hotkey to the macro.
7. PopUp Menus. In the standard configuration, popup menus should be assigned to the F12 key. To create a popup menu you must already have a set of macros in your *.mex file. With the appropriate *.mex file open,
7.1. Click on Add a macro button (or menu Macros-->Add a macro). Add a Macro window will open.
7.2. Click on the Popup Menu radio button.
7.3. Assign a hot key, then click on the now activated Build a Menu button.
7.4. Available macros will appear in the upper window, and you click on the Add to add to your menu. Be sure to click on the Properties tab to assign a Nickname and the Scope tab to restrict to Catalog.exe.
7.5. Macros run from the Popup menu do not need to be assigned to a hotkey (i.e., they will run even when No Activation has been selected)
7.6. You can edit the Popup pad, adding new macros with the insert arrows, taking off macros you find you don't need, and you can move the macros up and down with the up/down arrows on the right. Or, you can edit one of the preset popup menus that come with the master files, selecting the diacritics you use the most (or the least) or the function keys you use the most (or the least). The Popup menu is sometimes most useful for infrequently used macros since the key sequence doesn't need to be memorized or looked up.
7.7. TIP: the nickname begins with Popup menu if you need to find the menu in the macro list and you haven't assigned a category to it.
7.8. To run a macro from a Popup pad:
a. Position the cursor where the macro should begin running
b. Press the Popup pad hotkey to activate the menu display (do not activate the Voyager window before performing 8.7c following or the macro will not run)
c. Either double-click on the macro nickname in the menu display or, type the number or letter to the left of the nickname. The menu display will close automatically and the macro will run.
7.9. TIP: If you import a Popup menu from the master file, select and import all of the macros to be used in the Popup menu at the same time.
The preset popup menus are disabled. To enable the one or the other, see 9.
8. Disable/Enable. Macros disabled in the master files are considered to be generally useful enough to be assigned a standard hotkey, but require training in their use, so they are distributed in the disabled status so untrained staff will not run the macro accidentally. To enable a disabled macro:
8.1. Open the macro file, and with the mouse select and right click on the macro to be enabled. The menu options will open.
8.2. Click on Enable Macro on the menu.
8.3. Click on the Macro Explorer icon at the top of the far left column. You will be prompted to save the change. Click OK. (Or, click on the save icon on the toolbar)
9.1. there is a table listing all the Macro Express key mappings for diacritics and special characters [3].
9.2. The number pad has been mapped to the old NOTIS diacritics at Normal. The old NOTIS number pad diacritics at Shift are mapped to ALT + <keypad number>. There are some NOTIS diacritics on the keypad that were mapped to the CTRL + <keypad number>, and the mapping follows NOTIS in that case.
9.3. The same diacritics are also listed on a popup menu evoked by pressing F12. (If the menu has been enabled) If a diacritic listed on the popup menu is doubleclicked it will be entered in Voyager wherever the cursor has been placed. (A diacritic can also be entered by pressing the key for the number or letter to the left of the listing or by selecting the listing and pressing Enter.)
9.4. To turn off the diacritic mapping on the number pad (i.e. to enter numbers), press CTRL + Number pad 5. This macro will toggle Macro Express from the ...D.mex file to the ...N.mex file. To enter diacritics again, toggle back by pressing CTRL + Number pad 5 again. Alternatively, if the ...D.mex file is open, hold down the WIN key and press the number pad numbers. (The latter is not a toggle & it is unclear why it works.)
9.5. Staff should be warned that pressing the Voyager CTRL+d sequence (which turns on the alternate character set) will cancel the Macro Express diacritics macros (the diacritics macros include Ctrl + d, so pressing CTRL + d before running the macro prevents the software from evoking the alternate character).
9.6. To enter diacritics when ...D.mex is on, NUM LOC must be on.
9.7.Diacritics mapped to the keyboard follow the Windows ALA Keyboard Map. Diacritics at “normal” position are generally evoked with Ctrl + Alt; diacritics at “shift” position are generally evoked with Ctrl+Alt+Shift. (There are some exceptions that occur when the key sequence conflicts with a Windows or Macro Express sequence)
10. Important Macro Express System Key Sequences:
10.1. Ctrl+Alt+Shift+z Opens the list of macros that apply to the topmost window. If you click on any of the macros displayed on the list, it will run. To close the list, use the standard Windows command Alt+F4.
10.2. Ctrl+Alt+Shift+v. Terminates Macro Express. To re-start:
Programs-->Macro Express-->Macro Express 3
10.3. Ctrl+Alt+Shift+w Opens Macro Express Editor
11. Training (primarily for staff new to Macro Express):
11.1. Practice use of macros in torbis rather than prodorbis
11.2. Practice in torbis: when you depress a key sequence to run a macro, you must take your fingers off the keys for the macro to execute.
11.3. Practice in torbis: The Erase-End-of-Field (EOF) macro has been mapped to Shift + Delete in the current macro file configuration. On NOTIS, EOF was on the Page Down key. The Page Down function has been retained in order to facilitate navigation in lengthy menus, something that was not a feature in NOTIS.
11.4. Practice in torbis: Text macros (all diacritics, most MFHD macros) depend on the correct placement of the cursor in order to run properly (and not replace the wrong text!).
11.5. Walk through each of the macros listed on the standard function keys table (note that this table lists macros that include all the function keys as well as important macros that are NOT mapped to the function keys and which are not listed on the template). URL for the table listing standard macros:
https://collaborate.library.yale.edu/cpdc/PDF%20files/Standard%20Macro%2... [4] [4]
11.6. There is a template for the function keys at:
https://collaborate.library.yale.edu/cpdc/PDF%20files/voyager%20catalogi... [2]
NOTE: The template must be printed on legal size paper.
38 new macros have been created to effect rapid selection of the desired search index.
12.1. All macros are distributed as No Activation. However, each macro has a default hotkey that will be prompted when the macro is activated. Individual users are free to map a given macro to another hotkey, especially if it is expected that the macro will be heavily used. Be sure to consult the complete keyboard mapping table to make sure that the hotkey selected for re-map is available (i.e., don't re-map to a Macro Express system hotkey, a Window key sequence you also need, or the hotkey of another macro you expect to use).
12.2. The macros are written to run in the Cataloging, Circulation, or Acquisitions modules. When switching between modules you can run the macros in all three modules in sequence, except that the Staff Headings searches are not available in the Circulation or Acquisitions modules. CAUTION: If you run multiple instances of any single module, e.g. two instances of the Cataloging module, for any given session, the first instance in which any Search macro is run will be the only instance in which the Search macros will run. So, if a Search macro is run in the second instance of the Cataloging module, the Search macros will then only work in that second instance and will malfunction if run in the first instance of the Cataloging module. To reset the Search macros close all Voyager modules and terminate MacroExpress, then restart the Voyager modules and MacroExpress.
12.3. The macros have been created for indexes in PRODORBIS (production Orbis). CAUTION: some indexes in PRODORBIS are not in Torbis (the test & training database). If you are in Torbis and try to run a macro for an index not active in Torbis, the macro will search for the index indefinitely, or until you abort it. Until the macro is aborted, you cannot run any other macros.
Some Search macros work only in Orbis and other Search macros work only in LCDB. They simply don't work, so they don't need to be aborted if run in an inappropriate database
12.4. Most of the Search macros run with a delay of 175 microseconds following the Text type command. The delay will vary depending on the workstation, and in some cases no delay is necessary. If the Search macro retrieves the wrong index, the usual solution is to increase the delay to around 300 microseconds. To change the Delay speed: double-click on Delay; a Set Delay window will open. Change the delay from 175 to 300 and click OK; then save the updated version of the macro. (Don't forget to save the macro before you test it!) Expert users can also experiment to see if the macro will run if the delay is disabled. To disable: select the Delay line and click on the ! in the left gray column and save; a red line will cross out the Delay command. To re-enable: select the Delay line and click on the ! in the left gray column and save.
13. Checklist for Creating New Macros:
13.1. The program under which you will run your macro should be running.
13.2. Make sure your target file is up. Click on New Macro button on the toolbar or from menu, Macros-->Add Macro. Add Macro window will open.
13.3. From the Add Macro window, select the hot-key to be used to activate the macro. Assign your hot-key from Alt + Shift, Ctrl + Shift, or Win + Ctrl only. These ranges have been designated for individuals and specific teams. Your team may want to reserve one of these ranges for macros used by all or most members of the team. ALTERNATIVELY: select No Activation if you intend to map the macro to an existing Popup menu. Now click on the Scripting Editor button; the Scripting Editor window will open (with 2 subwindows Commands and Macro Script); note the tabs above the Command Subwindow: Script, Properties, Scope, Security, Notes.
13.4. Before you begin writing the script, click on the Properties tab and assign a Nickname; click on the Scope Tab and click on the Program Specific radio button, then click Select. Select Programs window will open. IMPORTANT: You must select a specific program or programs under which the macro is allowed to run. If you do not specify a program, the macro will run globally (the default selection) and interfere with non-Voyager programs like Eudora or even general Windows functions.
13.5. From the Select programs subwindow, select the program under which the macro will run. For the Voyager cataloging module, generally this will be CATALOG.EXE. Clicking on the program name will select it to the Selected Programs subwindow. Click the Add button. CATALOG.EXE will now appear under Select from a list of installed Programs; there will be a box Run if on Top checked below. Now click the OK button. Now click on the Script Tab to go back to the Scripting Editor.
13.6. To create a simple text macro, click on A Text under Commands, then double click on Text Type. Text Type direct editor window will open.
13.7. To enter a function in the text type string, click on the function name in the menu. It will appear in brackets. Key in unbracketed text for the macro to type in. Click OK to save the string. <to save the macro itself, you need to click on the save icon on the toolbar after clicking OK>.
13.8. Test macro. Sometimes it helps to save only a short string of commands and test to make sure the short string works before adding more commands. In Voyager, sometimes you need to include F8 to allow editing within a cell.
13.9. In some cases, you need to insert a delay of ca. 10 microseconds between command strings. Click on Timing under Commands, then double click on Delay. Be sure to select the radio button for microseconds and enter the number of microseconds. (The default is seconds so you must re-select)
13.10. When you add a command to a string, you may need to move it up or down in the sequence. Use the Up/Down arrows on the side of the window to do this.
13.11. Housekeeping. Keep a backup file of custom macros (macros assigned in the ranges reserved for customization). It should be relatively easy to obtain a copy of the standard macros, but no one will ordinarily have a copy of your custom macros.
13.12. Macros based on recording of mouse positions are not readily transportable and in some cases may not work if you re-size your window. Use the Script Editor to record key strokes when possible.
13.13. The same function key or key sequence can run different macros in different modules. (If the scope is set properly)
Multiple macros cannot run concurrently in Macro Express. Most macros close after running through a prescribed and limited sequence of commands. However, some macros are set to close only after a prescribed number of sequences have run, or after a defined period of time,* or some other condition occurs. If that condition never occurs (as with some Search macros in Torbis), the macro will run indefinitely. A macro is running when a running figure is in the Start tray, usually on the bottom left corner of the Windows display. The running figure will replace the Macro Express "crossed M" as long as the macro is running. If a macro that is usually enabled does not run, check the Start tray; another macro may be running.
To abort the macro, right-click on the running figure. You will be prompted to abort the macro; click OK.
Alternatively: Abort the macro by using the key sequence Scroll Lock + Break (usually above the number pad). This might be necessary if the macro includes mouse movements, which could stop the user from being able to right click on the running icon.
*An example is the Circulation Override macro, which is set to run until 100 charges have been made; if fewer than 100 charges are made in the session, the macro will need to be aborted. However, if it is not aborted, it is set to time out after 2 minutes. If staff use the Override macro, expert users should be sure they know how to abort the macro.
15. HELP. Questions, corrections:
Acquisitions: Eric Friede. Cataloging: Todd Fell.
Previously revised: 12/14/04
Macro Express: Keyboard Map
| Last Revision 1/19/05 | ||||||
| KEY | Used by Windows | Used by Voyager | ME Acquisitions | ME Cataloging | ME Circulation | Other |
| A | XX | XX | XX | XX | XX | |
| B | XX | XX | XX | XX | XX | |
| C | XX | XX | XX | XX | XX | |
| D | XX | XX | XX | XX | XX | |
| E | XX | XX | XX | XX | XX | |
| F | XX | XX | XX | XX | XX | |
| G | XX | XX | XX | XX | XX | |
| H | XX | XX | XX | XX | XX | |
| I | XX | XX | XX | XX | XX | |
| J | XX | XX | XX | XX | XX | |
| K | XX | XX | XX | XX | XX | |
| L | XX | XX | XX | XX | XX | |
| M | XX | XX | XX | XX | XX | |
| N | XX | XX | XX | XX | XX | |
| O | XX | XX | XX | XX | XX | |
| P | XX | XX | XX | XX | XX | |
| Q | XX | XX | XX | XX | XX | |
| R | XX | XX | XX | XX | XX | |
| S | XX | XX | XX | XX | XX | |
| T | XX | XX | XX | XX | XX | |
| U | XX | XX | XX | XX | XX | |
| V | XX | XX | XX | XX | XX | |
| W | XX | XX | XX | XX | XX | |
| X | XX | XX | XX | XX | XX | |
| Y | XX | XX | XX | XX | XX | |
| Z | XX | XX | XX | XX | XX | |
| [ | XX | XX | XX | XX | XX | |
| ] | XX | XX | XX | XX | XX | |
| \ | XX | XX | XX | XX | XX | |
| Tab | XX | XX | XX | XX | XX | |
| ; | XX | XX | XX | XX | XX | |
| " | XX | XX | XX | XX | XX | |
| , < | XX | XX | XX | XX | XX | |
| .> | XX | XX | XX | XX | XX | |
| ? | XX | XX | XX | XX | XX | |
| 1 | XX | XX | XX | XX | XX | |
| 2 | XX | XX | XX | XX | XX | |
| 3 | XX | XX | XX | XX | XX | |
| 4 | XX | XX | XX | XX | XX | |
| 5 | XX | XX | XX | XX | XX | |
| 6 | XX | XX | XX | XX | XX | |
| 7 | XX | XX | XX | XX | XX | |
| 8 | XX | XX | XX | XX | XX | |
| 9 | XX | XX | XX | XX | XX | |
| 0 | XX | XX | XX | XX | XX | |
| `(accent) | ||||||
| minus | XX | XX | XX | XX | XX | |
| equal | XX | XX | XX | XX | XX | |
| Esc | Cancel current task | XX | XX | XX | XX | |
| F1 | Help (context-specific) | Override | Help (Connexion) | |||
| F2 | Rename sel item | Valid Values | XX | XX | XX | |
| F3 | Search for a file or folder | Insert Field Before | XX | XX | XX | |
| F4 | Insert Field After | XX | XX | XX | ||
| F5 | Refresh active window | Open MFHD or MFHD dialog box | ||||
| F6 | Cycle through screen elements in a window or on desktop | From MFHD, opens Bib Title Tab | ||||
| F7 | Retrieve barcode window | Enter selected patron barcode | ||||
| F8 | Edit a Field | XX | XX | XX | ||
| F9 | Insert Delimiter | XX | XX | XX | ||
| F10 | Activate menu bar in active program | XX | ||||
| F11 | Unselect text | |||||
| F12 | popup window | popup window | ||||
| Insert | ||||||
| Home | ||||||
| Page Up | ||||||
| Delete | Delete | XX | XX | XX | XX | |
| End | End of Field? | |||||
| Page Down | ||||||
| Left Arrow | Open next menu to the left or open a submenu | XX | XX | XX | XX | |
| Right Arrow | Open next menu to the right or open a submenu | XX | XX | XX | XX | |
| Up Arrow | ||||||
| Down Arrow | ||||||
| K0 | Ligature left (first half) | |||||
| K. | ||||||
| K1 | Dot below | |||||
| K2 | Grave | |||||
| K3 | Circle below | |||||
| K4 | Circumflex | |||||
| K5 | Tilde | |||||
| K6 | Cedilla | |||||
| K7 | Umlaut | |||||
| K8 | Acute | |||||
| K9 | Macron | |||||
| K/ | ||||||
| K* | Double dot below | |||||
| K- | Double tilde first half | |||||
| K+ | High comma centered | |||||
Macro Express Troubleshooting Archive
(Jan. 2007)
1. 866. This macro is used in the MFHD to add an 866 field with the correct indicators. If you place the cursor in the preceding field, hold down the SHIFT key and press F6, the macro should add an empty 866 field:
| 852 | 0 | 1 | ‡b sml ‡h TN210 C65 ‡i A14+ ‡m Oversize |
|
866
|
4 | 1 | ‡8 0 ‡a v.42(1947)-v.83(1988), |
| 866 | 4 | 1 | ‡8 0 ‡a |
On some workstations, the macro is entering the 866 like this:
| 852 | 0 | 1 | ‡b sml ‡h TN210 C65 ‡i A14+ ‡m Oversize |
|
866
|
4 | 1 | ‡8 0 ‡a v.42(1947)-v.83(1988), |
| 866 | 4 | 1 | ‡ ‡8 0a |
To correct, edit the last Text Type line of the macro by deleting one each of <ARROW LEFT> and <ARROW RIGHT>.
On the distributed macro:
1<TAB><CONTROL><ARROW LEFT><ARROW LEFT><F9>80<CONTROL><ARROW RIGHT><ARROW RIGHT>
Edit the Text Type line to:
1<TAB><CONTROL><ARROW LEFT><F9>80<CONTROL><ARROW RIGHT>
TIP: You might want to keep the old Text Type line in reserve in case you change workstations.
2. Charge to Prep. This macro is used primarily in SML Tech Services where items charged to the cataloging unit need to be charged to the Preparations team for purposes of status tracking. In the Circulation module, pressing F7 opens the Charge window, enters the barcode number for the Prep Team, and places the cursor in Item Barcode prompt slot. The macro as distributed works if entering the Prep Team Barcode evokes a Patron Blocked window. If it does not, the macro aborts. If your macro is aborting, disable the Wait for Window Title "Patron blocked" and disable all of the lines following. Save changes.
(To enable/disable, select the line in the Macro Script with your mouse and click on the exclamation point icon in the column to the left of the Macro Script window)
Macro script should now look like this:

3. Override macro (F1) [affected XP workstations]. If, after pressing F1 and scanning the first barcode, a drop down menu appears and the macro stops running, the problem can be fixed by following Text type: <ALT> o with two Enters.
4. Circulation macros [affected Windows 2000 workstations].
a. Open the macro listing from the Macro Explorer window and click on the Scope tab. The default Scope is Program Specific.
b. Click on the radio button for Window Specific and click on the Select button.

c. Select all Window titles (left box) named Voyager Circulation and click on the ADD button.

d. Click OK, then (important!) save changes. (Click on the save icon, or click on the File menu and then click save, or click on the Macro Explorer icon in the Actions column and click Yes when prompted to save the changes.)
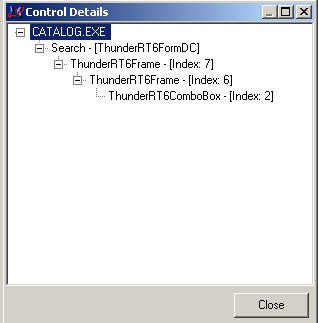
5. Open Search Window. (Alt /). On some workstations, running the Open Search Window macro opens a "Go to Search for Box" window along with the Search window.

The macro continues to run until the "Go to" window is closed. When the "Go to" window is closed, an additional window prompting you to acknowledge the abort will also require a click.

Often the "Go to" window will appear behind the Search window, and the only indication that the macro is running will be the running figure icon in the start tray that replaces the Macro Express icon when a macro is running.
![]()
Until the macro is aborted (point cursor on the icon and right click), no other macro will run.
To fix, line out the last line of the Macro Script. (See 4.2 for lining out) Be sure to save the change!
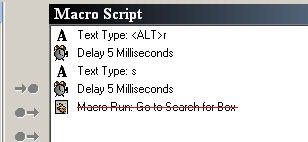
Voyager MacroExpress Keypad Map
|
NUM LOCK |
/ |
*=double dot below: x̤ |
-=double tilde (first
Ctrl+-=d.t. (2nd |
|
7=umlaut: ü |
8=acute: í |
9=macron: ō Alt+9=breve: ŏ |
+=high comma Ctrl (and)+= |
|
4=circumflex: â |
5=Tilde: õ |
6=Cedilla: ç |
|
|
1=dot below: ḥ |
2=grave à Alt+2=alif: ʾA |
3= circle below: u̥ |
Enter |
|
0=ligature Left: ︠a |
DEL |
||
Popup Menu: F12 (must be enabled manually)
5/3/05/rev. 9/23/05
2. Using Macro Express
A list of basic Macro Express edits and tips that most staff should be able to perform without the aid of an expert user: how to use the Staff Search index macros to change the index in the Search window, how to use locally programmed function keys in Voyager, changing preliminary record templates, how to run the status tracking macro in the circulation module, etc.
Changing Bibliographic Templates from a Pop-up Menu
At the time of the Voyager implementation in 2002, the Yale Cataloging Implementation Team created & distributed a set of 7 templates for creating bibliographic records corresponding to the various bibliographic formats, i.e. books, serials, cartographic materials, CD-ROMs, microfilm, video, & dissertations.
These templates should be used for creating on-order or in-process records based on the format of the item, but changing the template normally takes 8 steps:
- Click Options on the menu bar.
- Select Preferences .
- The window Session Defaults and Preferences will pop up.
- Click the tab Folders/Files .
- Under Templates, click the ... box at the end of Bib directory.
- The window Select Bibliographic Template will pop up.
- Select the template that you would like to set as your default and click OK .
- Click OK on the Session Defaults and Preferences window.
(Many workstations have been re-set to open in Voyager Extensions when the Bib ... box is clicked at Step 5, requiring even more adjustments.)
This is a fairly complicated process, and as a result, on-order/in-process records for non-book items are sometimes created in the books format in error. At the other end of the workflow, If the cataloger has to change the format, the fixed fields require extensive re-editing. If the process of changing the template is simplified, it's hoped that the correct template will be used most of the time.
To simplify template changing, macros have been created to change the template to: books, serials, CD-ROMs, maps, microfilm, & video. The dissertation template was not included because Yale dissertations are not processed by SML Acquisitions; for some reason a template for sound recordings was never created by the implementation team.
In the current configuration, the macros to change templates are mapped to the PopupAcq menu, which must be enabled. The procedure for enabling a macro (or a pop-up menu) is different from the procedure for activating a macro, as described in Tip 1, and is also much simpler! Note also that none of the individual macros are activated; they only run in conjunction with the enabled PopupAcq menu. A macro does not have to be activated or mapped to a key-sequence to be run from a pop-up menu.
Check in Macro Explorer to see if the PopupAcq menu has been disabled. Select (click on) the Acquistions folder under Categories. Find the line item for PopupAcq. Note that pop-up menus have a different icon. If the macro is disabled, it will display in italics.
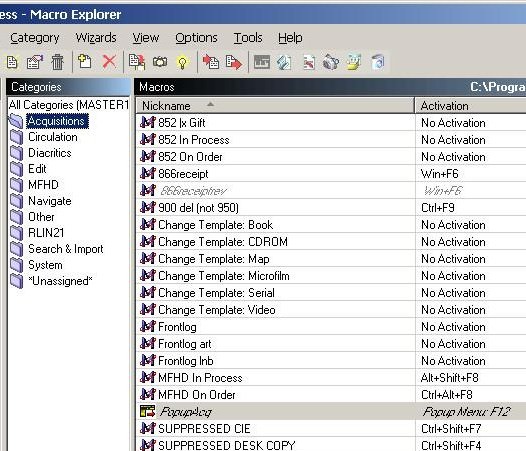
If the PopupAcq menu is disabled, enable it by placing the cursor on the PopupAcq line, right-clicking to open the Options menu, and selecting (clicking) Enable. The line will no longer be italicized when the popup menu has been enabled.

You only have to enable the PopupAcq menu once, if at all. Once the menu has been enabled, it stays that way until you use the menu option to disable it.
Changing a bibliographic template using Macro Express:
The Voyager window must be on top.
Press F12. The PopupAcq menu is mapped to F12 and will display. In the standard configuration, the template macros are mapped to line numbers 6-9, A-B.
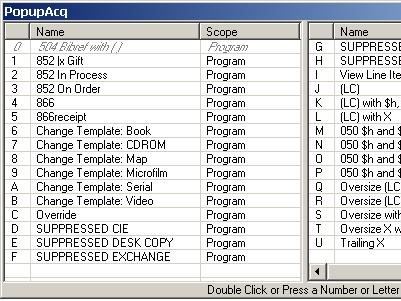
Assuming the default preference has already been assigned to the Book template, change the template to Video by double clicking on B/Change Template:Video or by pressing B on your keyboard.* The video template will display and the PopupAcq menu will close. Enter the bibliographic data for the order or receipt record, and click on Save to DB to create the in-process record.
*CAUTION: pressing F12 automatically selects the PopupAcq window. If you click the mouse outside of the PopupAcq window you de-select the window and the macros will not run. To re-select the PopupAcq window, click on the title bar of the PopupAcq window.
Video template:

If you want to re-set the template back to Books, press F12 and double-click on 6/Change Template: Books, then close the Books template window when the macro opens it.
Copying a Text Macro
Use for routine macros where the only change is to the text. First of all, if you need a particular text for a batch of orders, you can always go into an existing text macro and change the text. However, if you need to use multiple texts repeatedly to process a batch, you have the option of using the copy macro function to create a separate text macro. Instructions:
Scenario: Acquisitions macro to type the text Invoice exists. You want to create a macro to type Purchase Order.
1. Determine the key sequence the macro will map to. The key sequence should begin with "Ctrl-Shift": that initial sequence is reserved for custom macros. If you use another sequence, you may conflict with a previously created macro.
Scenario: The existing macro is on Ctrl-Shift-x. You decide the new macro will be on Ctrl-Shift-y.
2. Now click on the Macro Express icon to open the Macro Explorer editing window.
3. Find and select (single click) the macro to be copied (Invoice).
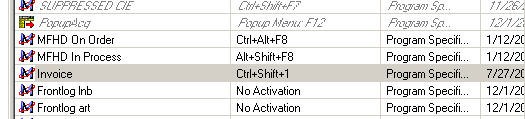
4. Having selected the macro to be copied, do one of the following:
a. Click on the Copy Macro icon on the toolbar. If you place the cursor on the icon a balloon should pop up with the legend "Copy Macro"--in the screen-shot, the icon has been circled.

b. Or, click on the Macros menu and select Copy Macro:
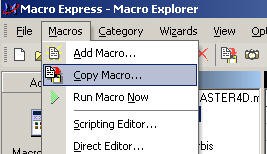
c. Or, with the cursor on the macro to be copied line, right click and select Copy Macro from the menu:
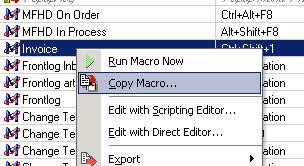
5. The Copy Macro window will open. Verify that the Default Activation: Hot-Key has been selected. Click the cursor in the Select a Hot Key box. Type the key sequence you have decided on. In this scenario, you would type Ctrl-Shift-y. Verify in the window that you have selected the intended key sequence. Click OK.
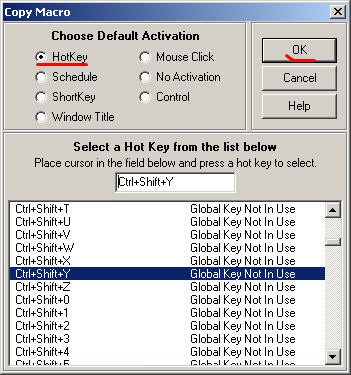
6. A copy of the original macro will now be listed (the name of the original macro preceded by "Copy of"). If you have difficulty finding it, click on the Nickname bar to arrange the macros alphabetically and look under C. Double click the Copy of <macro> line to perform the edits.
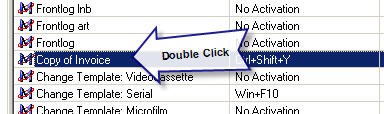
7. When you double click the Copy of <macro> line, the Scripting Editor will open. First click on theProperties tab to open Properties:
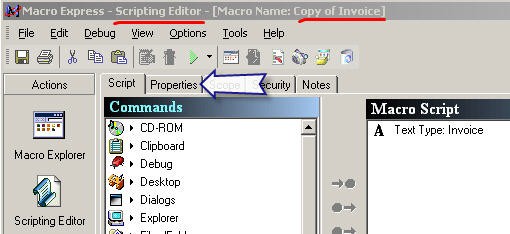
8. In the Properties window, replace the Nickname: Copy of <Macro> with the name of the new macro. In this scenario, Purchase Order. Then, click on the Script tab.
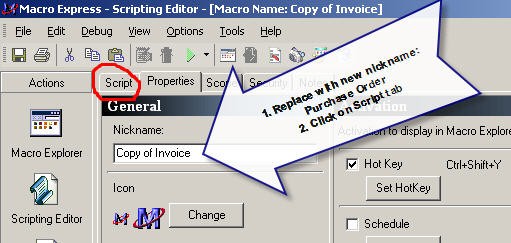
9. Clicking the Script tab will re-open the Scripting Editor window. In the Macro Script window on the right side, double click on Text Type: [text].
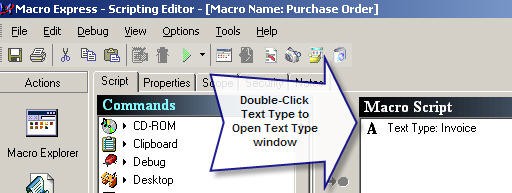
10. In the Text Type window, replace the text. Then click OK.
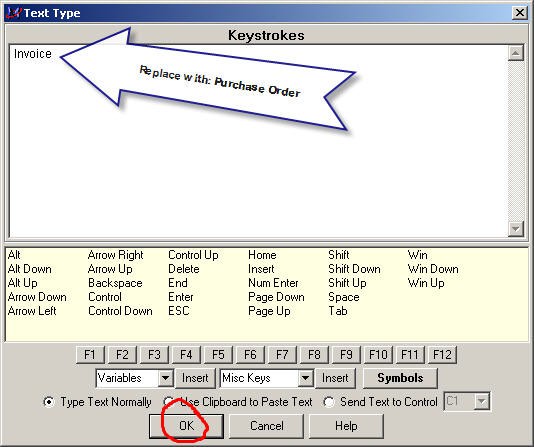
10. When you click OK, the Scripting Editor window will re-open. Clicking OK does not save the macro. You can save in a number of ways:
a. Click on the Macro Explorer icon. This will prompt you to save--click Yes. You will then return to the Macro Explorer edit window, which you can now close.
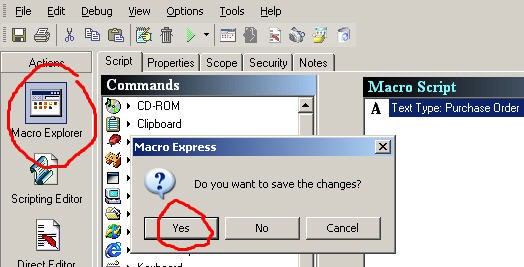
b. Or, click on the File Menu and click Save on the menu. You will then return to the Macro Explorer window. You can now close the Macro Explorer window.
Override (Voyager Circulation Module)
The Voyager Circulation Module is used for status tracking in several YUL units. As an item moves from one unit to the next, it is charged to the receiving unit's pseudopatron status. When charging an item on Voyager Circulation, most Technical Services workstations require the user to respond to one or two window prompts before the charge is completed. For example, an item wanded to SML Preparations from an SML Catalog Dept. workstation generally will display the following window:

The Override button must be clicked (or one can press ENTER) to get past this Item Blocks window. Often a 2nd Item Blocks window will follow:

Again, the Override button must be clicked (or ENTER pressed) in order to complete the charge:

Thus, a change in status charge can require one or two extra clicks. Not much of a problem when restricted to one or two items, but significant when a shelf's or truckload's worth of books needs to be charged.
The override macro will do all of your clicking automatically:
1. From the Voyager Circulation module, open the Charge window (click on the Charge icon on the toolbar) and wand or type in the pseudopatron code. (There is a macro that can do all of this as well, but we'll deal with that at some other time.)
2. Press F1. (Note that the current default hot-key for the Override macro is no longer F12, which was the hotkey used in earlier versions.)
3. An icon of a running figure will replace the Macro Express icon in the program tray:
Before:
![]()
After:

3. Click in the Item Barcode slot and wand the item's barcode. The macro will override the Item Blocks and Information window(s), charge the item, and position the cursor in the Item Barcode slot for the next item barcode to be wanded.
The current default on the Override macro will allow up to 100 charges. If the maximum number of charges is attained, simply press F1 again. Your Expert User can re-set the macro to a higher maximum number if considered necessary.
4. CAUTION: As long as the Override macro is "on" (i.e., the running figure icon is in the tray), you will not be able to run any other macro (in any Voyager module). To turn off the macro, use your mouse to place the cursor on the running figure icon and right click. The following window will appear:

Click OK and you will be able to resume using other macros.
If you forget to abort, the Override macro has been set to close automatically in 2 minutes and 15 seconds. If you see the following window,

Click OK. The macro "Override" has been aborted dialogue box will appear; click OK again. You can now continue using Macro Express!
PS: The Override macro also works if you have to do multiple discharges:
1. Click the Discharge icon on the toolbar.
2. Press F1
3. Wand barcode of item to be discharged. The macro will click through any Item Blocks and Information window that appears and complete the discharge.
Using a Macro to Select/Change a Search Index
The Voyager search indexes are very extensive, but finding the one you need can sometimes be time-consuming. In the Cataloging Module there are 30+ indexes to select from. If you are a cataloger, you probably use the Staff Name Search index frequently to do authority checking. The Voyager search window usually opens with the Title index on top:

In Voyager you change the index--if your hand is steady--by pulling down the scrollbar, scrolling down until you find Staff Name Heading, and then clicking on it.

Or, you can click in the Search by box and type "s" until Staff Name Heading comes up. The second strategy works pretty well because the most heavily used indexes float to the top.
But if you select an index like Staff Subject Heading and then want to change to Staff Name Heading, you will have to type "s" in the Search by box 13 times (or pull down the scroll bar and click 6 times in the reverse direction and then click on Staff Name Heading). Or, if you didn't remember that you have to click in the reverse direction, you could click 22 times forward and then figure out that you were supposed to click in the reverse direction. Or you could remember that Staff Name is close to Title and Title always comes up first, and type "t" and then "s").
Or, you can use the Search Staff Names Heading Search macro.
First make sure the macro has been activated. To activate the macro, follow the instructions at: Activating a Macro [5]. If you have difficulty following the instructions, get help from your Expert User. The activation instructions are also listed on the Tips for Expert Users section on the Macro Express at Yale home page.
Once the macro has been activated,
-open the Search window (Title will probably be the index displayed in the Search by box); note that the cursor does not need to be in the Search by box
-press down the keys Alt, Shift, and y, and then let go (the keys used to run a particular macro are called hot keys)
-the Search by menu will scroll automatically to Staff Name Headings Search and place the cursor in the Search for box
If you're new to Macro Express, note that you have to let go of the hot keys before the macro can run. All 3 keys need to be pressed down before you let go in order for the macro to run successfully. Don't press down Alt, let go, press Shift, let go, and press y: the macro won't run and the only result will probably be the letter y in the Search for box. You also don't have to snatch your hands away from the keyboard when you let go of the keys, the program will give you enough time to let go. Practice running the macro a bit until you get a feel for the response time of the program. In the documentation and in the Macro Express program's window, it is a convention for the hot key sequences to be punctuated by the plus sign; if the key sequence is given as Alt+Shift+y, don't hold down the plus key when you run the macro.

If you find the Search Staff Name Headings Search macro to be useful, consider activating other Search selection macros, such as Search Staff Subject Headings Search. The Search macros you activate should depend on the nature of the work you do. If you use the ISBN index a lot, activate the Search ISBN (020a|z) macro . If you use the Call Number index frequently, activate the Search Call Number macro. Remember that the index will not work if the database you are working in does not not use it. For example, the Search Staff Name Headings index is not available when the Cataloging Module is opened from Acquisitions.
Why do the Search macros need to be activated? There are around 40 Search macros. Different searches need to be used depending on the kind of work you are doing; most of us don't need to use all of them. Every macro activated means one less key sequence that can be used for custom hot key mapping to macros that might be far more useful for your work. (Most Search macros have their unactivated default hot keys mapped to Alt+Shift, which has been reserved for customized, workstation specific macros.)
Kudos to Eric Friede for creating all of the Search macros. If you have specific questions about the Search macros or ideas about improvement, you can e-mail him by clicking on his link on the Macro Express at Yale page.
Voyager Shortcuts: Function Key Macros You Need to Know About
A number of macros to shortcut Voyager procedures have been mapped to the function keys. We'll go through those that should have wide application in numerical order.
A general tip on using macros mapped to function keys if you aren't used to them. The macro doesn't execute until you stop pressing the key! For example, if the instruction is Shift+F10, press the Shift key and keep it down until you have pressed the F10 key. Then let go (stop pressing) both of the keys.
If you're using the old Macro Express files, have your expert user re-set to the new files so you can use the new & improved function key macros!
Ctrl+F1. Close All Windows
Voyager's "Close all windows" is menu driven & requires use of the mouse: File-->Close All. It can also be somewhat hard to find on the menu:

Using Macro Express,
To close all windows, hold down the Ctrl key and press F1 if you prefer to limit your mouse clicking or if it's more convenient to keep your hands in the keyboard area.
Ctrl+F2. Copy Record ID.
At some point, we all need to be able to copy Voyager record IDs efficiently and accurately in the course of our work. One of the major annoyances in working with Voyager is that it lacks the functionality to copy record ID numbers into the Windows clipboard. One of the nice by-products of our locally developed ExportQ software is that it allows us to copy the Orbis bibliographic record ID to the Windows clipboard. Unfortunately, ExportQ does not allow us to copy the MFHD record ID or the Item Record ID to the clipboard, and there are some instances when this is necessary.
But using Macro Express:
To copy the record ID of any bibliographic, MFHD, or item record in Orbis to the Windows clipboard, display the record and press Ctrl+F2. You should be able to paste the Orbis ID number into e-mail, an electronic document, or another Voyager dialog box.
F5/F6. Retrieve MFHD/Retrieve Bibliographic Record
The macro on F5 is designed to retrieve the MFHD when either the bibliographic or item record window is "on top." (If there are multiple MFHDs, pressing F5 from the bibliographic retrieves the Select or Add Holdings dialog box, which lists all MFHDs associated with the bibliographic record.)
The macro on F6 is designed to retrieve the bibliographic record from either the MFHD or the item record windows.
The macros work best when the windows are maximized.
F7. Open the Retrieve Item Record dialog box.

The standard Voyager procedure for opening the Retrieve Item Record dialog box is menu driven and requires 3 clicks: Record-->Retrieve by Record ID-->Item Record.
Using Macro Express:
To open the Retrieve Item Record dialog box, press F7.
It's a common practice to retrieve records by the barcode number instead of using the Search window indexes, but up till now, getting from the item record to the Bibliographic record usually required going through the Hierarchy window, which required:
- one click to open
- one click to de-select the item record line
- one click to select the bibliographic line, and
- one click to retrieve the record.

Using Macro Express can save a lot of mouse clicking here:
1. Press F7, then wand the barcode. (Wanding includes an automatic Enter command, so the item record will be retrieved)
2. Press F6. (Bibliographic record is retrieved)
Tips:
a. The macros work best when the windows are maximized.
b. The F6 macro sometimes works erratically from the item record even when the windows are maximized, since the timing on workstations varies. Sometimes using the macro a 2nd time will cause it to work for the rest of the session. If this doesn't work, press F5 (to get the MFHD) and then press F6.
PS: Using Macro Express:
Press Ctrl + F7 to create a new item record. (The appropriate MFHD record should be on top when you run the macro.)
F10 Select Orbis Database to Search
If you're in Orbis and want to bring up the Search window without clicking on the toolbar, just press F10.
Shift+F11 Opening the OCLC Import File
You've exported a bibliographic record from Connexion. Now you need to open the OCLC import file (import.dat) so you can save the record into Orbis. The standard Voyager procedure for opening an OCLC import file:
- From the menu. Record-->Import-->From new file. Select Import file window opens, set to "Look in" the Voyager Catalog folder.
- Double-click on the OCLCIMP folder. "Look in" changes to OCLCImp.
- Double-click on the import.dat file icon.
- The file c:\Voyager\Catalog\OCLCImp\IMPORT.DAT opens.
Using Macro Express,
To open the OCLC (import.dat) file, hold down the Shift key and press F11.
Historical note: when different character settings for OCLC and RLIN were used, an earlier version of the macro re-mapped Local import: to OCLC to ensure that the proper character setting was used. In 2006, the only character setting used should be MARC21 UTF-8, which should be pre-set in your preferences. The current macro, Import File OCLC 5.0, does not re-map the character setting to UTF-8. If the MARC21 UTF-8 setting has not been pre-selected, you will see this message if you run the macro:
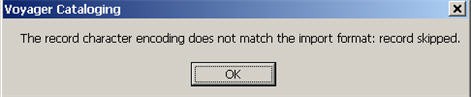
If you see this message, click OK, then open Preferences-->Mapping and re-set Local Import: to MARC21 UTF-8. Then run the macro again.
3. Creating and Editing Macros
This section focuses on the mechanics of creating a macro or editing existing macros. It will probably be of most use to your unit's expert user or users. Coverage includes: activating a macro, creating a macro, analysis of the complex frontlog macro, and the Get Control function.
Activating a Macro
(MEx=Macro Express)
See also: Using a Macro to Select/Change an Index [6]
To activate the macro Search Staff Name Headings Search:
1. On most workstations that have MEx loaded, MEx is started automatically when the user logs on to Windows; the MEx icon should be in the program tray, usually at the bottom right of the window.
![]()
What you want to do is to open the MEx Macro Explorer window by clicking on the MEx icon in the program tray. The MEx Macro Explorer window will open.
2. The MEx Macro Explorer window has the standard menus and toolbar at the top of the window common to many Windows programs. Note also the three vertically tiled subwindows or columns: Actions, Categories, Macros. In the Macros subwindow, check the title bar to verify that you are using one of the 2 master files released with the Dec. 2006 push, MASTER3N.mex or MASTER3D.MEX. Make sure the file is located in the standard path: C:\Program Files\Macro Express 3. (We've found some workstations where the file was in the Eudora Attachments folder).
The macros have been organized in folders listed in the Categories subwindow. Select (left click) the Search & Import folder; the Macros in this folder will display in the Macros subwindow. The Macros subwindow is organized in 4 columns: Nickname, Activation, Scope, Modified. Clicking on Nickname at the top of the column will sort the macros by name; clicking on Activation will sort the macros by hot-key. You want to find the Search Staff Name Headings Search macro. Since there are 50+ macros in this folder and most of them have been assigned No Activation, your best bet is to search by nickname.
3. Click on Nickname, then scroll down to Search Staff Name Headings Search. Note that under the Activation column, the macro Search Staff Name Headings Search has No Activation. Double click on Search Staff Name Headings Search.
The MEx Scripting Editor window will display.
This window also has the standard menu and toolbar, along with 3 vertically tiled subwindows or columns: Actions, Commands, Macro Script. Above the Commands column note especially 5 tabs: Script, Properties, Scope, Security, Notes.
4. Click on the Properties tab. Two vertically tiled subwindows or columns will appear, General and Activation. Note the Hot Key selection box in the Activation window.
5. Click in the Hot Key selection box. The grayed-out Set Hot Key button will be activated and the default hot key sequence, Alt+Shift+Y will appear. Click on the Macro Explorer icon at the top of the Actions column. You will be prompted to save the update; click the Yes button. The Macro Explorer window will reappear. Note that under the Activation column for Search Staff Name Headings Search No Activation has been replaced by Alt+Shift+Y. Close the Macro Explorer window and test the macro.
IN CASE YOU DIDN'T KNOW: closing the Macro Explorer window (clicking the x in the upper right program window) does not close the MEx program. MEx is set up to be running at all times; you should see the MEx icon in the program tray during all of your Windows sessions. If you need to close the program, place the cursor on the MEx icon, right click to open the menu options, and then click Terminate Macro Express.
6. To assign a different hot key, click on the Set Hot Key button once it has been activated. The Set Hot Key Activation window will appear.
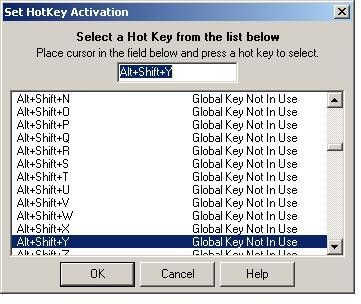
Type the key sequence in the space provided, or scroll through the list of key sequences and click on the sequence you want to apply. You have to be very careful if you don't accept the default key sequence. We checked most of the default hot keys and they are not in contention with other macro hot keys, Voyager functions, and Windows functions. If you assign a customized key sequence to your macro, it will override any previously assigned macro or native Voyager or Windows function. (Hey, how come my Ctrl+v doesn't work in Voyager anymore?) Check the Complete Macro Express Keyboard Assignments table [1] to make sure the key hasn't already been assigned. Keep in mind:
a. most of the default hot keys under No Activation are in the Alt+Shift+<key> range.
b. most native Voyager commands on the menus use Alt+<key> or Ctrl+<key>; replacing the native Voyager command with another function will not only block the Voyager command, it may also disrupt other macros that include the Voyager command in the macro string.
7. Alternatively, take a look at the Function Key Template [2] and cross check it against the table of basic Macro Express Function Keys [7]. If you can identify a macro that is never used in your workflow, map it to that function key. For example, if you or your staff member never needs to enter 040 CtY$cCtY (Shift+F12), map a macro you expect to be used more heavily to Shift+F12. Note that a number of functions listed on the Function Key Template are native Voyager, e.g. F2, F3, F4, F8, F9--you do not want to map any macro to those keys.
Creating a Macro (Override Example)
For this tip, we will walk through the creation of this relatively simple macro & demonstrate some features of Macro Express in the process. Kudos to Roy Lechich, formerly in the Integrated Systems and Programming group, for creating this elegant macro.
1. To begin, we need to determine what it is we want to do. In this case, we want the program to click the Override button whenever Voyager opens an Item Blocks window during the circulation charging process. See the Macro Express Tip: Override (Voyager Circulation Module) [8]for context.
2. Next, we need to translate what we want to do into Voyager commands, and translate the Voyager commands into key stroke sequences. Although Macro Express can map mouse positions, the macro is more reliable when key strokes are used because mouse positions vary depending on window sizing. There is almost always a Voyager key stroke equivalent for a Voyager command. The key stroke equivalent for the Voyager override command is Alt+o. (Since Voyager has mapped most of its commands to Alt+<key> sequences, always avoid mapping your macros to Alt+<key<>).
3. From the Macro Explorer window, we go to the menu bar and click on the Macros menu, then click Add Macro .... (Note that we could do the equivalent from the toolbar. Look for the New Macro icon (usually under Category) and click on it.)
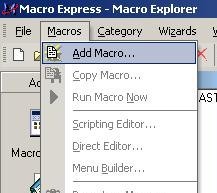 |
 |
4. The Set HotKey Activation window opens:
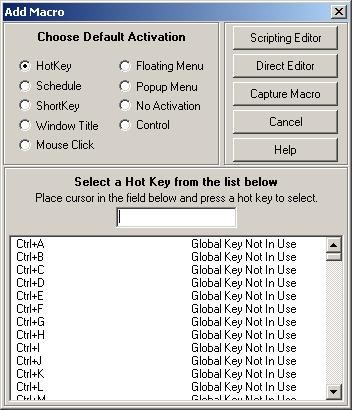
5. Note that the default activation is Hotkey and that the cursor is prompted to the Select a Hot Key ... Place cursor in the field below ... box. To map the macro to the F1 function key, simply press the F1 key. Then click on the Scripting Editor button (upper right of the window).
6. The Scripting Editor window will open.

7. Basically, you want the program to type Alt+o. This is a Text command. Click the A Text option in the Command window, and then double click the Text Type option from the submenu:
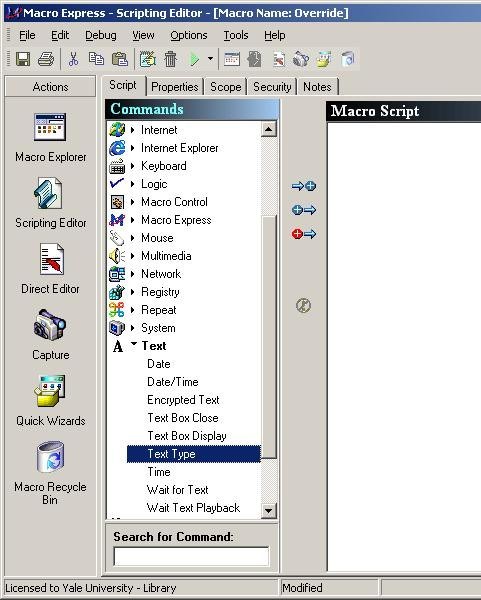
8. The Text Type window will open. Record keystrokes in the Keystrokes area blank space. To enter the keystroke for Alt, click on Alt on the menu below the keystrokes area. To enter the keystroke for o, type o. Then click the OK button at the bottom of the window.

9. The first line of the macro now appears in the Macro Script window:

10. However, the macro must only run under certain conditions, i.e. when we are charging items. For the program, that means that we want the window with Charge in the title header to be running before the macro starts.
To impose this restriction, we first select the Logic command. From the extensive list of Logic options, double click on the option If Window.


The If Commands window opens. We select If Window on Top and specify the Window title: Charge. Note that Partial Match rather than Exact Match has been selected, which means that the macro will work with either Charge or Discharge in the title header.

11. The Macro Script is again on top, but the If condition is out of sequence.

12. Note the arrows on the left and right margins. The arrows on the left insert commands from the Commands list before, after, or at the end (in that order from top to bottom). The arrows on the right move lines of macro script up or down.
Since the Charge window is a precondition for the action, we want the condition (If Window Title "Charge" ...) to precede the action (Text Type <Alt>o). Therefore, we use the position arrow at the right margin to move the If condition before the Text type action. Clicking on the up arrow will reposition the highlighted line up one line.
Alternatively, we could set the position of the Logic command line in advance. At step 10. above, we could:
- single click (select) the Logic command If Window,
- single click the Text Type line in the Macro Script window (to select the script line we will insert before)
- click on the first insert arrow (Insert Before) on the left margin (the If Commands window will open as in section 10.)
- select or enter the same options for the If Commands window as in section 10. and click OK (the macro script line If Window Title "Charge" is on top will appear before the Text Type <ALT> o line).
Note that the macro would still run without the If condition "Charge" on top script line. The condition is more of a safety measure in case there are other Circulation windows where the Item Blocks windows are used.
13. We want the text type action to be performed during the Charging situation only when windows with the title header Item Blocks are on top. Although an If condition might also work, we choose a Timing command. This allows us to insert an automatic time-out and also allows us to avoid complicated If conditions, since the Item Blocks window is on top intermittently rather than continuously. From the Command list we select Timing. From the list of options under Timing, click on Wait for Window Title.
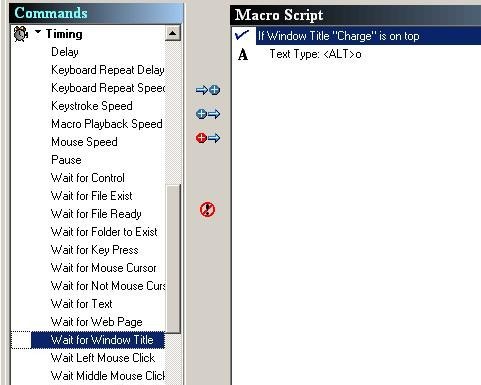
Since Timing is also a precondition for the action of Text Type, but subordinate to the more general Charge condition, we want to insert it after the If condition but before the Text Type. Make sure the If Window line is highlighted (selected) and then click on the 2nd insert button (insert after). The Wait for window will open.
14. From the Wait For window, we select Wait for Window Title to Appear, identify the Window title (Item Blocks and Information) and provide a Wait a Maximum of: 2 minutes 15 seconds. Because the macro does not close upon completion, it is important to provide a limited time out period. Click OK.
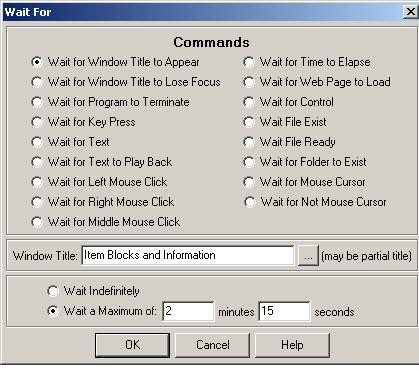
15. The Macro Script now appears with a Wait for Window title line. Since we predefined the insertion point, the Wait for Window Title script line appears after the If Window Title script line and before the A Text Type script line.

Alternatively, we could have double clicked on the Wait for Window Title command option to open the Wait for window, selected or entered the options, clicked OK, and used the positioning up arrow to move the Wait for command line before the A Text Type line.
16. The command syntax requires that you indicate the limit of the If condition. We go back to the Command options to find and click on Logic again. This time we select End If and double click. Since there are no suboptions under End If, the End If command line is placed at the end of the Macro Script.

At this point, the macro will run once and then stop under the conditions we have specified. If the Item Blocks window appears more than once during the charging process (and this is common on many units' workstations), the macro will stop after overriding only the first block, and the item will not be charged. The macro will only be useful if we can get it to run repeatedly without having to hit the hot key over and over again. In order to get the macro to run repeatedly once we have started it, we now want to insert the Repeat command.
17. We select Repeat from the list of Commands and then select Repeat Start for the option. We want the conditions and actions to nest within the repeat, so first select the first line of the Macro Script (If Window Title Charge ...) and then click on the first insert arrow (insert before).

18. The Repeat Options window opens. The default command is Start Repeat, which is what we want. However, note that the Repeat Count default is only 10. We don't want to re-start the macro after only 10 charges, so we simply add a 0 to the count to boost it to 100 and click OK. (No other changes need to be made in this window).
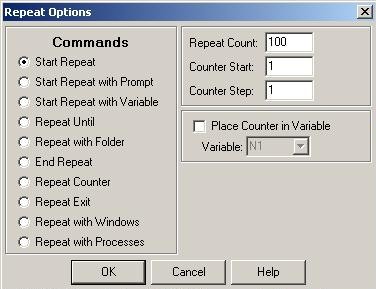
NOTE: we can easily revise the Repeat Count on the finished macro. From the Macro Explorer, find the macro item line Override in the Circulation folder and double click on it to open its Macro Script. Double click on the Start Repeat line in the macro script to open the Repeat Options window, type in a new Repeat Count, click OK, and save the change. (See Section 25 for different ways to save a macro).
19. To properly nest the macro within the Repeat condition, we need to script in where to end the condition. From the Command list, we again select Repeat, and from the list of options under Repeat, we double click on Repeat End, which will be inserted at the end of the script. (No insert arrows needed). The Macro Script for the Override macro looks like this:
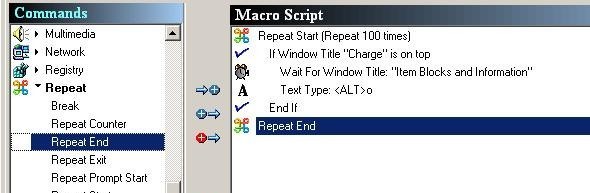
20. Now that we have created the macro, we need to name it & scope it. We name the macro by clicking on the Properties tab above the Commands subwindow:
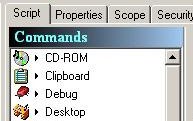
21. The Properties window opens. We type in a name for the macro, in this case Override. Note that the Hot Key has already been activated. (Step 5.) We click on the Scope tab.

22. The Scope window opens. The default scope is Global; it should be changed to Program Specific (click on the radio button). You never want your macro to run in all programs, i.e. globally; the macro should always be program specific (although in some cases you may want to run it in more than one program--but never globally). Clicking on the Program Specific radio button will un-gray the Select button next to it, which we then click.
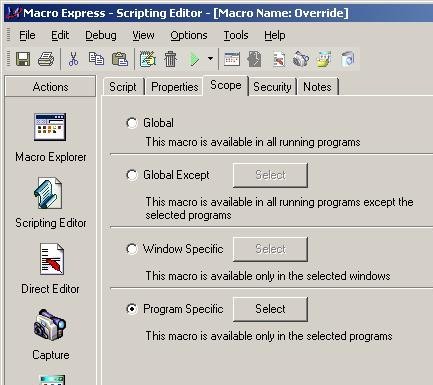
23. The Select Programs window opens. We only want the macro to run in the Voyager circulation module, so we use the scrollbar in the left subwindow to find and select CIRCULATION.EXE. We then click on the Add button (either will work) so that CIRCULATION.EXE appears under Select from a list of installed programswith Run if on top checked below. We then click the OK button.
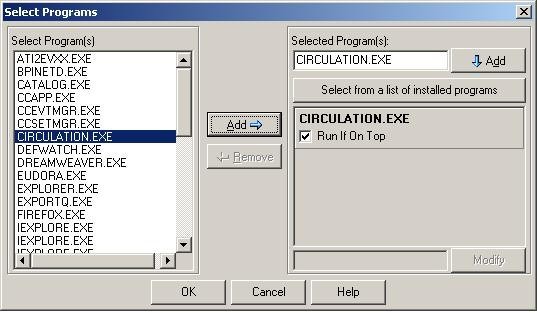
24. It is important to remember that the macro has not yet been saved. There are a number of ways to save the macro:
- Click on the File menu and then click on Save
- Click on the corresponding save icon on the toolbar
- Click on the Macro Explorer icon in the Actions column (you will be prompted to save the macro)
25. Testing should be an integral part of macro creation. The macro distributed in January 2005 looks like this:

Note the extra lined out If Window title ... condition. Different If Window Title ... conditions were tested. A nice feature of Macro Express allows the user to disable multiple lines of script without deleting them. The macro is saved in the lined-out version, and tested. If the results are unsatisfactory, the script line can be restored. If we wanted to try the macro using the script line If Window Title "Charge" is running instead of the command If Window Title "Charge" is on top, we would click on the macro script line If Window Title "Charge" is running to select it, and then click on the Disable Command icon in the left margin:
![]()
We also need to enable the script line If Window Title "Charge" is running by selecting the line. The red circle around the exclamation point on the icon will disappear and the exclamation icon now represents the Enable Command. We then click on the Enable icon. The red line-out through the script line If Window Title "Charge" is running disappears. We can now save the macro and test the edited version. Apparently the script If Window Title "Charge" is on top worked best; the other option was disabled but never deleted from the macro.
Deriving a New Change Template Macro from a Pre-existing Change Template Macro
1. Typically, your unit will probably have a template it is already using & you want to apply a change template macro to enhance productivity. Or if necessary, create the new template. Instructions may be found at Creating Templates in Voyager [9].
Be sure to save the template to:
c:\voyager\catalog\template\preliminary record templates
For demo purposes, we'll call the new/pre-existing template:
newtemplate.tem
2. Open Macro Explorer, select the Acquisitions folder from Categories, and right click any one of the Change Template macros. We'll use the Change Template: Serials macro for demo purposes. The options menu will open. Click on the Copy Macro option.
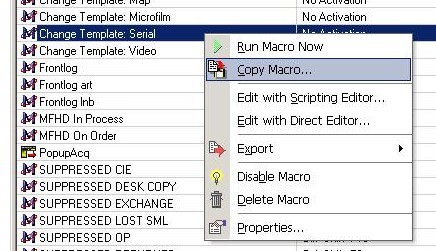
3. The Copy Macro dialog box will open. Leave the default No Activation as is and click OK.

4. The macro copy, named "Copy of <name of original macro>" will appear on the Nickname list immediately, under Copy of <name of original macro>.
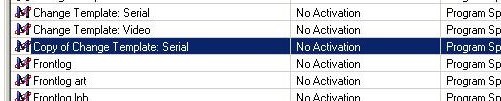
5. Double click on the line item for the macro copy to open up the Scripting Editior window.

6. From the Macro Script subwindow, double click on the line
A TEXT TYPE:c:\voyager\catalog\template\preliminary record templates\preliminary serial.tem
7. The Text Type window will open.

8. In the Keystrokes area, change the last element of the text string from preliminary serial.tem to newtemplate.tem and click the OK button at the bottom of the window.
9. Click on the Scripting Editor's Properties Tab. Change the Nickname to: Change Template: New Template.

Note that the Scope Tab does not need to be clicked. The Scope for the original macro (Voyager Cataloging Module) is carried over when the macro is copied.
10. Save the changes made to the macro. Click on the Macro Explorer icon, then click Yes to save the changes. (Or click on the Floppy icon on the Toolbar; or File-->Save)
11. Having created the new change template macro, you now need to add it to the PopupAcq menu. Double-click on the PopUpAcq line (in the same Acquisitions folder on Macro Explorer; see the Macro Express Tip 3). The PopUp Editor window will usually display. (If another PopUp Menu Builder window opens, click on the Editor tab):
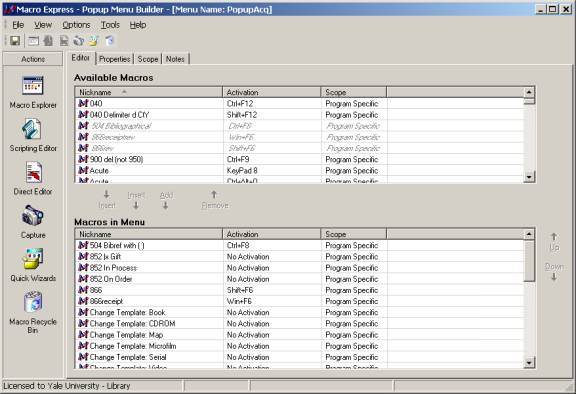
12. You want to get the new macro from the Available Macros window into the Macros in Menu window. First, use the the scrollbar for the Available Macros window to find the new macro Change Template: New Template. Click once on the line to select the macro. This will activate the Insert/Add arrows. Assuming you want to insert the new macro in alphabetical order, use the mouse to selectChange Template:Serial and click on the Insert (Above) arrow, i.e. the leftmost arrow. This should insert the macro before Change Template:Serial. If you change your mind, you can use the Up and Down arrows on the right of the Macros in Menu window (see image above) to re-locate the macro in the menu.

13. Save the new menu configuration. The next time F12 is pressed, the new macro will be listed in the order you specified.
14. Troubleshooting: the change template macros only work if the templates are in the proper folder and the folder path for the templates has been set in Voyager Sessions and Defaults to
c:\voyager\catalog\Template\preliminary record templates\
Make sure the workstation setting follows our local standard path.
Importing Macros
Important: macros can be attached in e-mail only as files; even if a single macro is sent, it must be first exported into a file.
1. Having received the file RDAFields.mex, save it to the Macro Express folder.
2. (The assumption is your current file is MASTER5D.mex, the MacEx file that contains both the Voyager diacritics macros and the Voyager functionality macros.) Open the Macro Explorer window. Under Categories (the 2nd window from the left, select the Edit category. The macros for the Edit category should appear to the right.
3. With the target category Edit selected, click on the Import Macros icon on the toolbar.
4. The Import Macros window will open.
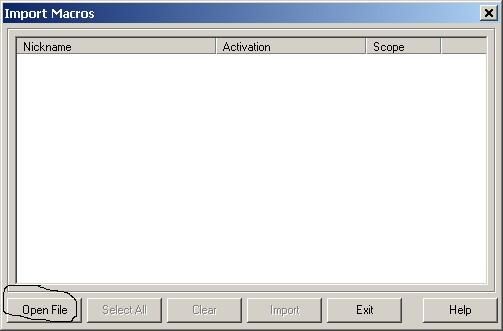
5. Click on the Open File tab. The Import Macro File window will open. Make sure "Look in" is aimed at Macro Express 3 (since that is where you moved the RDAFields.mex file).
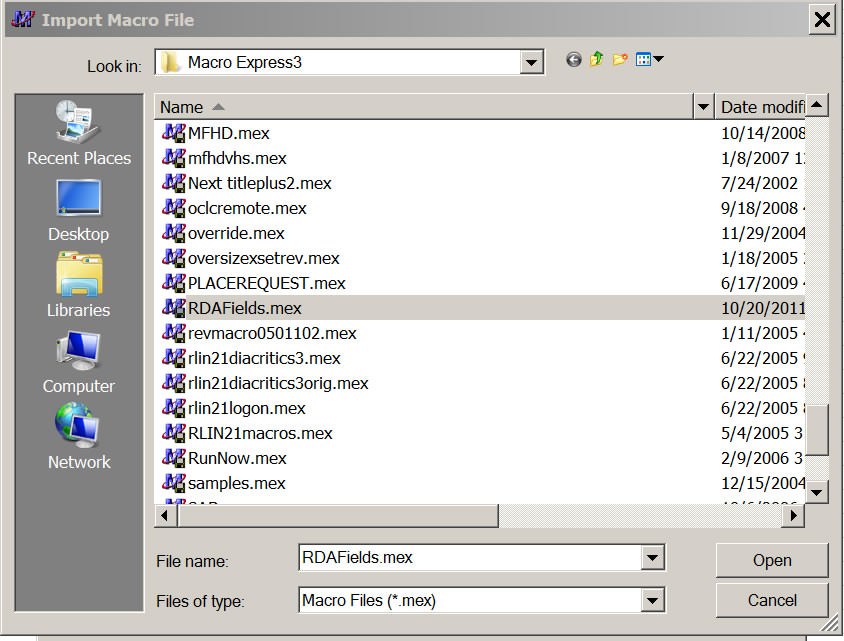
6. When the "Look in" window is open, double-click on RDAFields.mex (or select & click the OPEN tab). The Import Macros window will now list all macros in the file RDAFields.mex. (In this case, just one.)
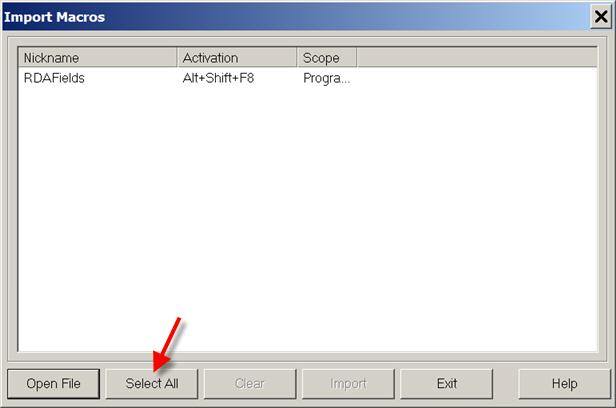
7. Click the Select All tab. The macro will be highlighted and the Import tab will be enabled.

8. Click on the Import tab. The macro will be copied into the Edit folder. Then click Exit.
Note: Sometimes when importing, you may get a message that one of the macros was using an activation key already claimed by a macro in your current file. Click Yes.
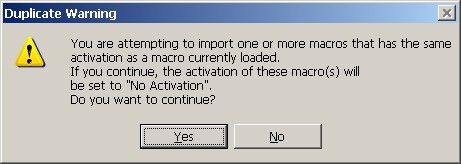
In that case, the newly imported macro will be imported as Inactivated. (It will not overlay the macro using that key activation.) You will need to either reassign the key activation on your current macro and then reactivate the import macro to its default activation key, or assign a new, non-conflicting activation key to the imported macro. (Check with your expert user.)
MACRO: Frontlog 2006-02 (draft)
NOTE: The macro was created by Jared Schwede (student working for SML Acquisitions) in 2004 and rev. and re-named by Eric Friede in 2006 to account for changes in Voyager 5.0.
BACKGROUND. When cataloging copy is not available at the time of receipt, SML Acquisitions staff route items without copy to the Frontlog, a caged area in the SML basement containing some 100,000+ items. For status tracking purposes, the physical item is associated on Orbis with an item record, and the item record is associated with a 14 digit barcode number, e.g. 39002059419508.The barcode itself is affixed to the book (or other physical item equivalent) and charged to a dummy Orbis patron, e.g. frontlg245.
Although there is a maximum number of potential charges to a frontlog patron, that number is large enough to warrant further subarrangement to facilitate retrieval due to patron requests. The subarrangement is based on an additional 6 digit barcode number printed on a slip kept with the book. The "Frontlog number" always begins with UNCAT followed by 6 digits, e.g. UNCAT225565. This number is used to shelve the book in the FRONTLOG area in the SML basement. In order for Circulation staff to find the book for a patron request, the number is entered in the Orbis MFHD record field 852 $h. This requires SML Acquisitions staff to change the MFHD 852 $h from this:
|
852 |
8 | 0 |
‡b sml ‡h In Process |
to this:
|
852 |
8 | 0 |
‡b sml ‡h UNCAT225565 |
OPERATION (General). The user sets up by opening the Cataloging and Circulation modules. From the Circulation module, the user opens the Charge window and enters the dummy patron name. If any windows are open in the Cataloging module, the macro is started from Cataloging to ensure that all Cataloging module windows are closed. (??)The user then turns on the macro, usually mapped to CTRL+f.
- The macro first prompts the user for the barcode number with a dialog box.
- When the barcode number is entered, the macro charges the item to the Frontlog status (the macro will override any intervening Circulation windows to do this).
- The macro then switches Orbis from the Circulation module to the Cataloging module,
- retrieves the item record via the item barcode number,
- opens the associated MFHD record,
- selects the In Process text in 852 $h, and
- opens a dialog box prompting the user for the frontlog barcode number.
- When the user wands the barcode number from the slip, the selected In Process text is replaced by the barcode number.
- The macro then switches Orbis from the Cataloging Module back to the Circulation and
- opens the dialog box prompting the user for the next item barcode number.
MACRO SCRIPT COMMENTS
1. Macro Playback speed: Normal. Because this is a complicated macro, the Macro Playback speed is included to allow the option of a slower playback if the macro needs to be tweaked.
To set Playback Speed:
- Select Timing from the Commands window,
- Double-click on Macro Speed to open the Speed dialog box,
- Click on the Macro Speed button,
- Enter Playback Factor 1 for normal playback speed.
- The macro script line should read: Macro Playback Speed: Normal Speed
2. If condition. The macro is intended to work with no record windows open in the Cataloging module, so this series of commands is intended to ensure that all record windows in the Cataloging module are closed. This is especially important since the macro needs to open some Cataloging windows later in the sequence, and these windows need to be closed before the macro can repeat. (??) If no Cataloging module windows are open, the macro will ignore this sequence (2.) and go on to 3 (but you don't need to specify this in the macro script).
- Select Logic from the Commands window,
- Double-click on the If Window option to open the If Window dialog box,
- From the Commands list in the If Window dialog box, click on the radio button If Window on Top
- In the same If Window dialog box, find below the Commands options list the Window Title: prompt slot, and enter the text: Voyager Cataloging - [
- Leave the Partial Match radio button selected
- Click OK button
- The macro script line should read: If Window Title "Voyager Cataloging - [" is on top
Comment: The window title Voyager Cataloging - [ ensures that the series of commands operates only if the Voyager Cataloging window is open. The Partial Match option means that the commands will work even if a specific record number and title are displaying after the initial Voyager Cataloging - [ on the title bar of the Cataloging Module window, e.g. Voyager Cataloging - [Bib 6018213 : Sobre o vale do mosteiro / Eugenio Mendes Pinto.]
- Select Text from the Commands window,
- Double-click on the Text Type option to open the Text Type window
- Below the blank Keystrokes space, several columns of function/command keys are listed. Select (single-click) Control in this list, which will cause the text <CONTROL> to appear In the Keystrokes space.
- Type the letter q after <CONTROL>; the keystroke sequence is now: <CONTROL>q
- Click the OK button
- The macro script line should read: Text type: <ctrl>q
Comment: In Voyager, the key sequence <ctrl>q saves the record. The following macro command sequence accounts for the dialog box that follows a save (<ctrl>q) command in Voyager, requiring the user to press ENTER to complete the save, followed immediately by the command sequence to close all open windows.
- Select Timing in the Commands window,
- Double-click on Wait Window Lose Focus to open the Timing Commands dialog box, where that option will have been selected,
- In the Window Title prompt slot, enter Voyager Cataloging - [ (or use the browser [ellipses] button to find & select the title),
- Click on the Wait a Maximum of: radio button (the current macro uses 10 minutes), and,
- Click OK
- The macro script line should read: Wait Window Lose Focus: "Voyager Cataloging - ["
- Select Text from the Commands window,
- Double-click on Text Type option to open the Text Type window
- From the command keys list under the blank Keystrokes space, click on Enter to select the <ENTER> key, then click on Alt to select the <ALT> key, then
- Type fo; the line should now read: <ENTER><ALT>fo
- Click OK
- The macro script line should read: Text Type: <ENTER><ALT>fo
Comment: <ALT>f opens the Voyager File menu; o selects the Close All command from the menu. The "if" situation where all Cataloging module windows need to be closed is now completed. However, Macro Express requires you to indicate that the "if" sequence is over, so:
- Select Logic from the Commands window,
- Double-click on the End If option (End If will appear as the last line of the macro script If sequence)
3. Now that all the windows in the Cataloging module are closed, the macro needs to activate the Circulation module window. Before this is done, the Circulation window is maximized.
- Select Windows/Programs from the Commands window.
- Double-click on Windows Maximize to open the Windows Commands dialog box; the Maximize Windows radio button should be pre-selected under the Commands options.
- Under the Window options, click on the Specific Window radio button to select that option and typeVoyager Circulation in the option slot
- The macro script line should read: Window Maximize: "Voyager Circulation"
Comment: Maximizing the Circulation window may no longer be necessary. The original version of this macro depended on mouse positioning, which worked more effectively with the Circulation module window maximized. Macros based on mouse positions are high-maintenance, since the positions need to be recalculated for different workstations or after software upgrades. The current version is based on key sequences (keyboard shortcuts). Key sequences don't change from workstation to workstation, and usually the only problem is if a key sequence or the screen layout changes after a software upgrade (as has been the case at times with Voyager 5.0).
4. Now the Circulation window must be activated, since you want to perform a function (charging the item barcode) in the Circulation module:
- Select Windows/Programs from the Commands window.
- Double-click on Window Activate to open an abbreviated version of the Activate/Launch Programdialog box. The Activate Window radio button should be pre-selected under the Activate/Launch Program Commands.
- In the Activate Window option slot, type Voyager Circulation, then click OK.
- The macro script should read: Activate Window: "Voyager Circulation"
5. At this point, we want the macro to open a dialog box to prompt the user to wand in the item barcode number. The prompt dialog box will look like this:

As an insurance measure, just to make sure that another variable has not been stored in the memory, a line of code is entered to clear variables before the prompt dialog box is evoked.
- Select Variables from the Commands window.
- Double-click on Clear Variables; the defaults should be Variable Type to Clear: Text Variables with radio button Clear All selected.
- Click OK; the macro script line should read Clear Text Variables: All
To create the prompt dialog box:
- Select Variables from the Commands window.
- Double-click on the Variable Set String option to open the Set Text String Variables dialog box.
- Under Commands in this dialog box, click on the radio button Prompt for Value.
- Variable Name T1 is the default, which is OK since this will be the first text variable in this macro.
- The Prompt Text field will open within the Set Text String dialog box. Type in: Please enter item barcode
- The center/center default positioning of the prompt box is OK to leave as is.
- Click OK; the macro script should read: Variable Set String %T1% from Prompt
6. The expected response to Please enter item barcode is for the user to wand the item barcode (i.e., the T1 variable text string). A delay of 100 milliseconds is added to the script to provide sufficient time for the macro to tell the computer to read and record in memory the wanded item barcode number and close the Please enter item barcode prompt window. With the Circulation module Charge Window now on top, the macro is then instructed to type the T1 variable (the item barcode number it has just read); the only space available for the number to be typed is the BARCODE slot.
7. With the item barcode number now typed into the BARCODE slot, the macro can now ENTER the number (text) string. A delay of 100 milliseconds is added to give Orbis time to bring up the Item Blocks and Information Window, an unfortunate extra step built into the Voyager technical services charging procedure whenever a new item barcode number is entered in a Tech. Services charge. The macro runs the key sequence <ALT>o to override the window. Depending on the workstation, another Item Blocks window may open, so another If condition sequence is added. The item is now charged to the Frontlog dummy patron.
8. The Circulation window is now minimized and the Cataloging module window is activated. In the Cataloging module, the Retrieve an Item Record (<ALT>rb) prompt window is opened. A delay of 100 milliseconds is entered to give the window time to open. The item barcode number (T1 variable) is typed in by the macro, with another 100 millisecond delay for the number to be read by Voyager. The Text Type <ENTER> (the equivalent of pressing the ENTER key) tells Voyager to retrieve the item record. Another delay is added to the script to give Orbis time to retrieve the item record. <maybe not necessary, since it's followed by the Wait for Window>
9. The Wait for Window Title accounts for different response times. A key sequence <ALT>rg is used to open the MFHD associated with the item record retrieved at 8. Another delay is written in (again the Wait for Window ought to take care of variations in response time). The clear variable command must be re-executed to clear out the T1 variable (the item barcode) so it can be replaced by the T2 variable, the frontlog barcode, or, alternatively, letters to initiate one of two If conditional sequences.
10. The prompt for the T2 variable is created. The T2 can be either the frontlog barcode number or a letter to initiate one of two sub-macros for lnb and art. If the location is sml, the frontlog barcode is wanded and the process continues.
11. If the letter "l" or "a" is entered, different sub-macros are run. This requires 2 If condition sequences to cover backlog locations lnb and art, initiated by a prompted letter "l" or letter "a" requested by the prompt. If a sub-macro is run, it loops back to the original prompt at which point the user is prompted to wand in the frontlog barcode only.
12. With the frontlog barcode=T2 based on 10. or 11., another sub-macro is inserted into the script, GOTO 852 in MFHD. The function of this macro is to align the cursor with the selection bar for the 852 field in the MFHD.
13. From the selection bar, a key sequence of TABS and <CTRLD><ARROW LEFT/RIGHTs> are used to select the In Process text in 852 $h, which is then copied to the clipboard and replaced with the T2 variable text, i.e. the frontlog barcode number. <BUT WHERE IS IT PASTED INTO THE MFHD???>
14. To account for situations where there is no In Process text or the macro did not successfully copy the text into the clipboard, an If conditional is added to halt the macro under any condition where the text is not In Process.
15. The macro is nested to allow indefinite repetition.
Staff Search Macros Component: Editing the Get Control Function
All of the Staff Search macros use 2 nested macros that may need to be adjusted when the Voyager software is upgraded. Attempting to use the macro (e.g. Alt-Shift-Y to change the Staff Search index to Staff Search Names), will abort the macro run and bring up the following window:
Because the macros are nested, the Search macros point to two separately configured macros, Capture Search By and Go to Search Box instead of including all of the steps in each Search macro. As a result, if something happens to these two macros, none of the Search macros will function. Conversely, if the two macros are properly configured, all of the Search macros should work.
Screen Shot of the Capture Search By Macro Script. Note the "Get Control" lines of the script. These are telling the program where to look before performing the instructions in any of the Search scripts (i.e. to dial up the appropriate search index). Behind the GUI, the Voyager programmers have identified different regions of the windows by various codes. ThunderRT6ComboBox corresponds to the index selection area in the Search window. The only way to identify the underlying code for the window area is to reassign the Get Control instruction.
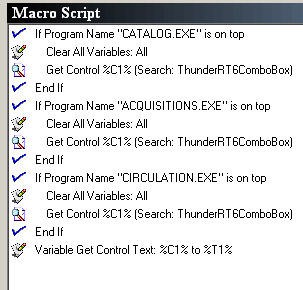
Preparation. Voyager needs to be running with the Search window open. The Voyager window should not be full screen; you need to see both the small Macro Express utility windows and the Voyager window on your monitor.
1. From the Macro Express script for Capture Search By macro, double click on the first Get Control instruction line. The Get Control window will open. Note carefully the Control Class text--the area in the Search window corresponding to this coding is what you are looking for. Click on the Launch Get Control Utility button.
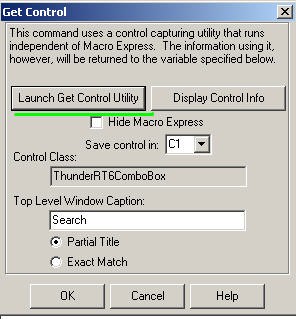
2. The Capture Window Control window will open. Note the Cross Hair symbol at the bottom of the window.
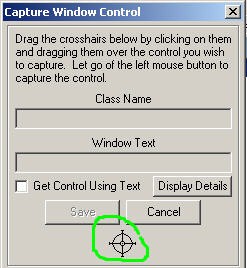
3. Make sure the Capture Window Control window and the Voyager window are both visible on the monitor and that the Search window is open in Voyager. If necessary, drag the Capture Window Control window to a corner of the monitor display so it can be accessed while the Voyager Search window can be seen.
4. Drag the cross hair icon to the search window (point and hold down the default left mouse button). The process will open a black lined rectangle. Use the mouse drag to make sure the rectangle overlays the select index slot. If the rectangle is correctly positioned, the Window Text in the Capture Control Window will be: ThunderRTComboBox. When that text displays, click the Save button.
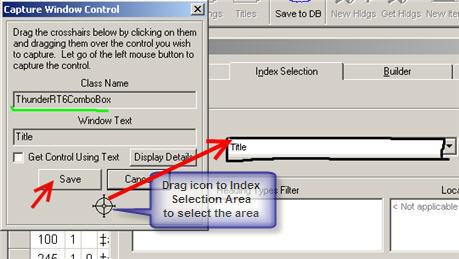
5. Repeat the process for the other Get Control lines in the script. The Variable Get Control Text line should not be changed.
6. Save the updated script.
Next, update the Go to Search For Box macro. This macro script is simpler:
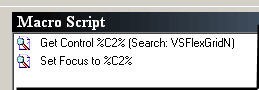
Follow the instructions for the Capture Search By macro, but select the Search for area of the Voyager Search window. Be sure that the cross hair is correctly aligned--the required area is very close to different areas. In the Capture Window Control, the Class Name text must be: VSFlexGridN. Note that you are changing C2 rather than C1. Only the Get Control line should be updated; be sure to save the updates. Since the macros are nested in the Search macros, updating the Capture Search By and Go to Search Box macros will allow all of the Search macros to function.
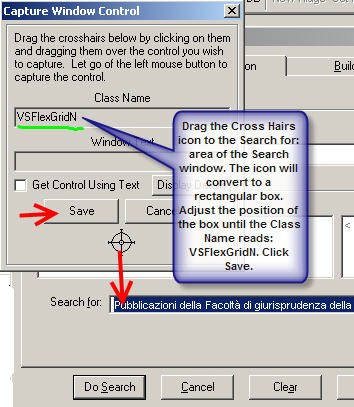
PS: Re-selecting and re-saving the class names is apparently required because the values in the hierarchy (click on the Display Control Info button on the Get Control Window) changed with 7.0.2. Re-selecting and re-saving re-synchs the macros.