For this tip, we will walk through the creation of this relatively simple macro & demonstrate some features of Macro Express in the process. Kudos to Roy Lechich, formerly in the Integrated Systems and Programming group, for creating this elegant macro.
1. To begin, we need to determine what it is we want to do. In this case, we want the program to click the Override button whenever Voyager opens an Item Blocks window during the circulation charging process. See the Macro Express Tip: Override (Voyager Circulation Module) for context.
2. Next, we need to translate what we want to do into Voyager commands, and translate the Voyager commands into key stroke sequences. Although Macro Express can map mouse positions, the macro is more reliable when key strokes are used because mouse positions vary depending on window sizing. There is almost always a Voyager key stroke equivalent for a Voyager command. The key stroke equivalent for the Voyager override command is Alt+o. (Since Voyager has mapped most of its commands to Alt+<key> sequences, always avoid mapping your macros to Alt+<key<>).
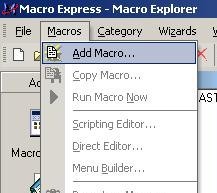
3. From the Macro Explorer window, we go to the menu bar and click on the Macros menu, then click Add Macro .... (Note that we could do the equivalent from the toolbar. Look for the New Macro icon (usually under Category) and click on it.)
 |
 |
4. The Set HotKey Activation window opens:
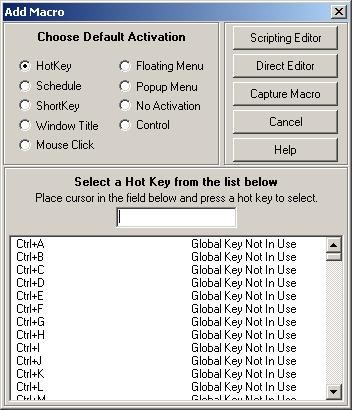
5. Note that the default activation is Hotkey and that the cursor is prompted to the Select a Hot Key ... Place cursor in the field below ... box. To map the macro to the F1 function key, simply press the F1 key. Then click on the Scripting Editor button (upper right of the window).
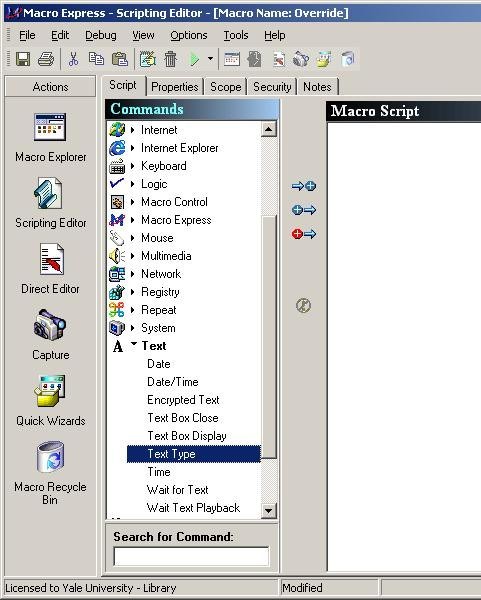
6. The Scripting Editor window will open.

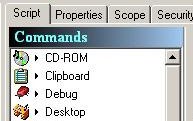
7. Basically, you want the program to type Alt+o. This is a Text command. Click the A Text option in the Command window, and then double click the Text Type option from the submenu:
8. The Text Type window will open. Record keystrokes in the Keystrokes area blank space. To enter the keystroke for Alt, click on Alt on the menu below the keystrokes area. To enter the keystroke for o, type o. Then click the OK button at the bottom of the window.

9. The first line of the macro now appears in the Macro Script window:

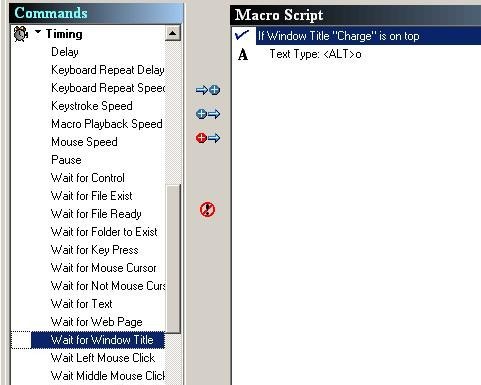
10. However, the macro must only run under certain conditions, i.e. when we are charging items. For the program, that means that we want the window with Charge in the title header to be running before the macro starts.
To impose this restriction, we first select the Logic command. From the extensive list of Logic options, double click on the option If Window.


The If Commands window opens. We select If Window on Top and specify the Window title: Charge. Note that Partial Match rather than Exact Match has been selected, which means that the macro will work with either Charge or Discharge in the title header.

11. The Macro Script is again on top, but the If condition is out of sequence.

12. Note the arrows on the left and right margins. The arrows on the left insert commands from the Commands list before, after, or at the end (in that order from top to bottom). The arrows on the right move lines of macro script up or down.
Since the Charge window is a precondition for the action, we want the condition (If Window Title "Charge" ...) to precede the action (Text Type <Alt>o). Therefore, we use the position arrow at the right margin to move the If condition before the Text type action. Clicking on the up arrow will reposition the highlighted line up one line.
Alternatively, we could set the position of the Logic command line in advance. At step 10. above, we could:
- single click (select) the Logic command If Window,
- single click the Text Type line in the Macro Script window (to select the script line we will insert before)
- click on the first insert arrow (Insert Before) on the left margin (the If Commands window will open as in section 10.)
- select or enter the same options for the If Commands window as in section 10. and click OK (the macro script line If Window Title "Charge" is on top will appear before the Text Type <ALT> o line).
Note that the macro would still run without the If condition "Charge" on top script line. The condition is more of a safety measure in case there are other Circulation windows where the Item Blocks windows are used.
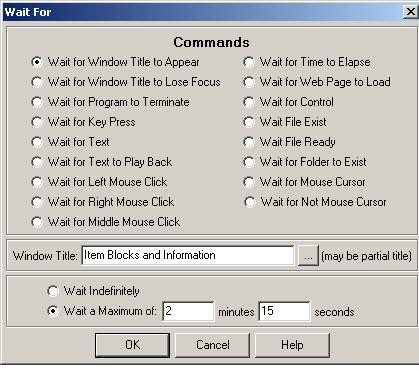
13. We want the text type action to be performed during the Charging situation only when windows with the title header Item Blocks are on top. Although an If condition might also work, we choose a Timing command. This allows us to insert an automatic time-out and also allows us to avoid complicated If conditions, since the Item Blocks window is on top intermittently rather than continuously. From the Command list we select Timing. From the list of options under Timing, click on Wait for Window Title.
Since Timing is also a precondition for the action of Text Type, but subordinate to the more general Charge condition, we want to insert it after the If condition but before the Text Type. Make sure the If Window line is highlighted (selected) and then click on the 2nd insert button (insert after). The Wait for window will open.
14. From the Wait For window, we select Wait for Window Title to Appear, identify the Window title (Item Blocks and Information) and provide a Wait a Maximum of: 2 minutes 15 seconds. Because the macro does not close upon completion, it is important to provide a limited time out period. Click OK.
15. The Macro Script now appears with a Wait for Window title line. Since we predefined the insertion point, the Wait for Window Title script line appears after the If Window Title script line and before the A Text Type script line.

Alternatively, we could have double clicked on the Wait for Window Title command option to open the Wait for window, selected or entered the options, clicked OK, and used the positioning up arrow to move the Wait for command line before the A Text Type line.
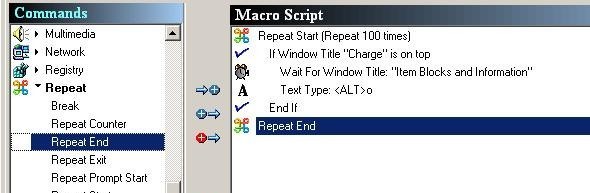
16. The command syntax requires that you indicate the limit of the If condition. We go back to the Command options to find and click on Logic again. This time we select End If and double click. Since there are no suboptions under End If, the End If command line is placed at the end of the Macro Script.

At this point, the macro will run once and then stop under the conditions we have specified. If the Item Blocks window appears more than once during the charging process (and this is common on many units' workstations), the macro will stop after overriding only the first block, and the item will not be charged. The macro will only be useful if we can get it to run repeatedly without having to hit the hot key over and over again. In order to get the macro to run repeatedly once we have started it, we now want to insert the Repeat command.
17. We select Repeat from the list of Commands and then select Repeat Start for the option. We want the conditions and actions to nest within the repeat, so first select the first line of the Macro Script (If Window Title Charge ...) and then click on the first insert arrow (insert before).

18. The Repeat Options window opens. The default command is Start Repeat, which is what we want. However, note that the Repeat Count default is only 10. We don't want to re-start the macro after only 10 charges, so we simply add a 0 to the count to boost it to 100 and click OK. (No other changes need to be made in this window).
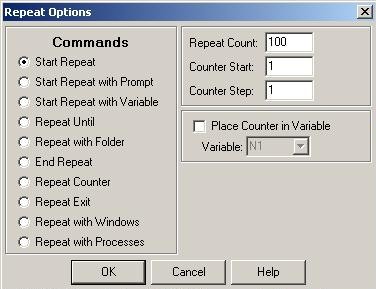
NOTE: we can easily revise the Repeat Count on the finished macro. From the Macro Explorer, find the macro item line Override in the Circulation folder and double click on it to open its Macro Script. Double click on the Start Repeat line in the macro script to open the Repeat Options window, type in a new Repeat Count, click OK, and save the change. (See Section 25 for different ways to save a macro).
19. To properly nest the macro within the Repeat condition, we need to script in where to end the condition. From the Command list, we again select Repeat, and from the list of options under Repeat, we double click on Repeat End, which will be inserted at the end of the script. (No insert arrows needed). The Macro Script for the Override macro looks like this:
20. Now that we have created the macro, we need to name it & scope it. We name the macro by clicking on the Properties tab above the Commands subwindow:
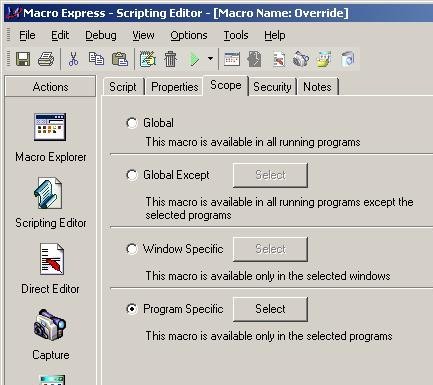
21. The Properties window opens. We type in a name for the macro, in this case Override. Note that the Hot Key has already been activated. (Step 5.) We click on the Scope tab.

22. The Scope window opens. The default scope is Global; it should be changed to Program Specific (click on the radio button). You never want your macro to run in all programs, i.e. globally; the macro should always be program specific (although in some cases you may want to run it in more than one program--but never globally). Clicking on the Program Specific radio button will un-gray the Select button next to it, which we then click.
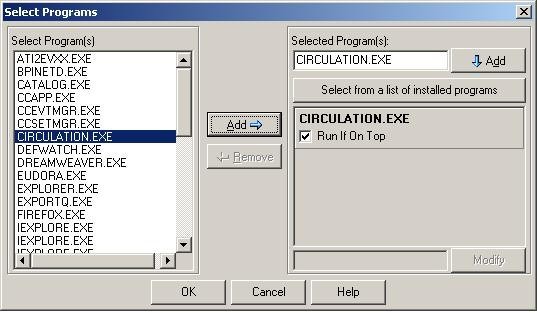
23. The Select Programs window opens. We only want the macro to run in the Voyager circulation module, so we use the scrollbar in the left subwindow to find and select CIRCULATION.EXE. We then click on the Add button (either will work) so that CIRCULATION.EXE appears under Select from a list of installed programswith Run if on top checked below. We then click the OK button.
24. It is important to remember that the macro has not yet been saved. There are a number of ways to save the macro:
- Click on the File menu and then click on Save
- Click on the corresponding save icon on the toolbar
- Click on the Macro Explorer icon in the Actions column (you will be prompted to save the macro)
25. Testing should be an integral part of macro creation. The macro distributed in January 2005 looks like this:

Note the extra lined out If Window title ... condition. Different If Window Title ... conditions were tested. A nice feature of Macro Express allows the user to disable multiple lines of script without deleting them. The macro is saved in the lined-out version, and tested. If the results are unsatisfactory, the script line can be restored. If we wanted to try the macro using the script line If Window Title "Charge" is running instead of the command If Window Title "Charge" is on top, we would click on the macro script line If Window Title "Charge" is running to select it, and then click on the Disable Command icon in the left margin:
![]()
We also need to enable the script line If Window Title "Charge" is running by selecting the line. The red circle around the exclamation point on the icon will disappear and the exclamation icon now represents the Enable Command. We then click on the Enable icon. The red line-out through the script line If Window Title "Charge" is running disappears. We can now save the macro and test the edited version. Apparently the script If Window Title "Charge" is on top worked best; the other option was disabled but never deleted from the macro.