1. Typically, your unit will probably have a template it is already using & you want to apply a change template macro to enhance productivity. Or if necessary, create the new template. Instructions may be found at Creating Templates in Voyager.
Be sure to save the template to:
c:\voyager\catalog\template\preliminary record templates
For demo purposes, we'll call the new/pre-existing template:
newtemplate.tem
2. Open Macro Explorer, select the Acquisitions folder from Categories, and right click any one of the Change Template macros. We'll use the Change Template: Serials macro for demo purposes. The options menu will open. Click on the Copy Macro option.
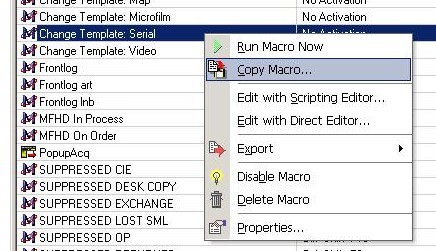
3. The Copy Macro dialog box will open. Leave the default No Activation as is and click OK.

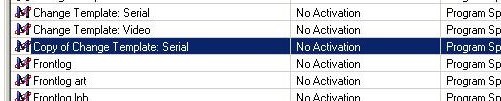
4. The macro copy, named "Copy of <name of original macro>" will appear on the Nickname list immediately, under Copy of <name of original macro>.
5. Double click on the line item for the macro copy to open up the Scripting Editior window.

6. From the Macro Script subwindow, double click on the line
A TEXT TYPE:c:\voyager\catalog\template\preliminary record templates\preliminary serial.tem
7. The Text Type window will open.

8. In the Keystrokes area, change the last element of the text string from preliminary serial.tem to newtemplate.tem and click the OK button at the bottom of the window.
9. Click on the Scripting Editor's Properties Tab. Change the Nickname to: Change Template: New Template.

Note that the Scope Tab does not need to be clicked. The Scope for the original macro (Voyager Cataloging Module) is carried over when the macro is copied.
10. Save the changes made to the macro. Click on the Macro Explorer icon, then click Yes to save the changes. (Or click on the Floppy icon on the Toolbar; or File-->Save)
11. Having created the new change template macro, you now need to add it to the PopupAcq menu. Double-click on the PopUpAcq line (in the same Acquisitions folder on Macro Explorer; see the Macro Express Tip 3). The PopUp Editor window will usually display. (If another PopUp Menu Builder window opens, click on the Editor tab):
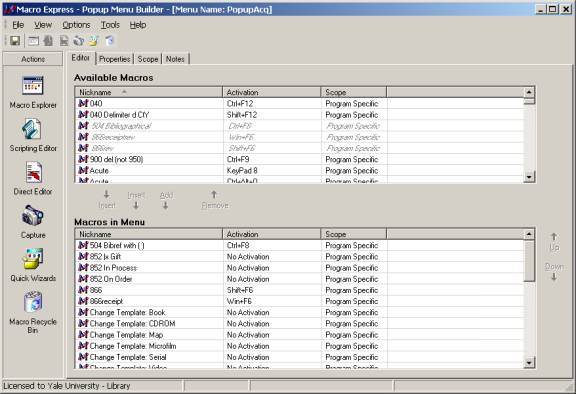
12. You want to get the new macro from the Available Macros window into the Macros in Menu window. First, use the the scrollbar for the Available Macros window to find the new macro Change Template: New Template. Click once on the line to select the macro. This will activate the Insert/Add arrows. Assuming you want to insert the new macro in alphabetical order, use the mouse to selectChange Template:Serial and click on the Insert (Above) arrow, i.e. the leftmost arrow. This should insert the macro before Change Template:Serial. If you change your mind, you can use the Up and Down arrows on the right of the Macros in Menu window (see image above) to re-locate the macro in the menu.

13. Save the new menu configuration. The next time F12 is pressed, the new macro will be listed in the order you specified.
14. Troubleshooting: the change template macros only work if the templates are in the proper folder and the folder path for the templates has been set in Voyager Sessions and Defaults to
c:\voyager\catalog\Template\preliminary record templates\
Make sure the workstation setting follows our local standard path.